Glossy Kitchen Laminate Design – Complete Guide for Indian Buyers
Clear, research-backed explanation of glossy kitchen laminate design with examples, FAQs, and practical tips for Indian homes and furniture work.
Note: This is independent informational content and is not affiliated with any manufacturer.
Quick Decision Summary
Best answer in one line: Glossy kitchen laminates deliver a modern, reflective finish that brightens compact Indian kitchens but require careful edge sealing and regular cleaning to maintain their mirror-like appeal.
If you're in a hurry: High-gloss laminates work exceptionally well for contemporary kitchen designs where you want surfaces that reflect light and create an illusion of space. They suit Indian kitchens with adequate ventilation and where fingerprint marks can be wiped regularly. Avoid them in high-humidity zones without proper edge protection, or if your household includes young children who constantly touch cabinet surfaces. Pair glossy upper cabinets with matte or textured lower cabinets for a practical, balanced aesthetic.
- Choose this if: You want a sleek, modern look; your kitchen has good lighting; you're comfortable with regular wipe-downs; your cabinets have proper edge banding.
- Avoid this if: Your kitchen lacks ventilation; you dislike seeing fingerprints; your budget doesn't allow for quality edge sealing; coastal humidity is extreme without climate control.
What Glossy Kitchen Laminate Actually Is
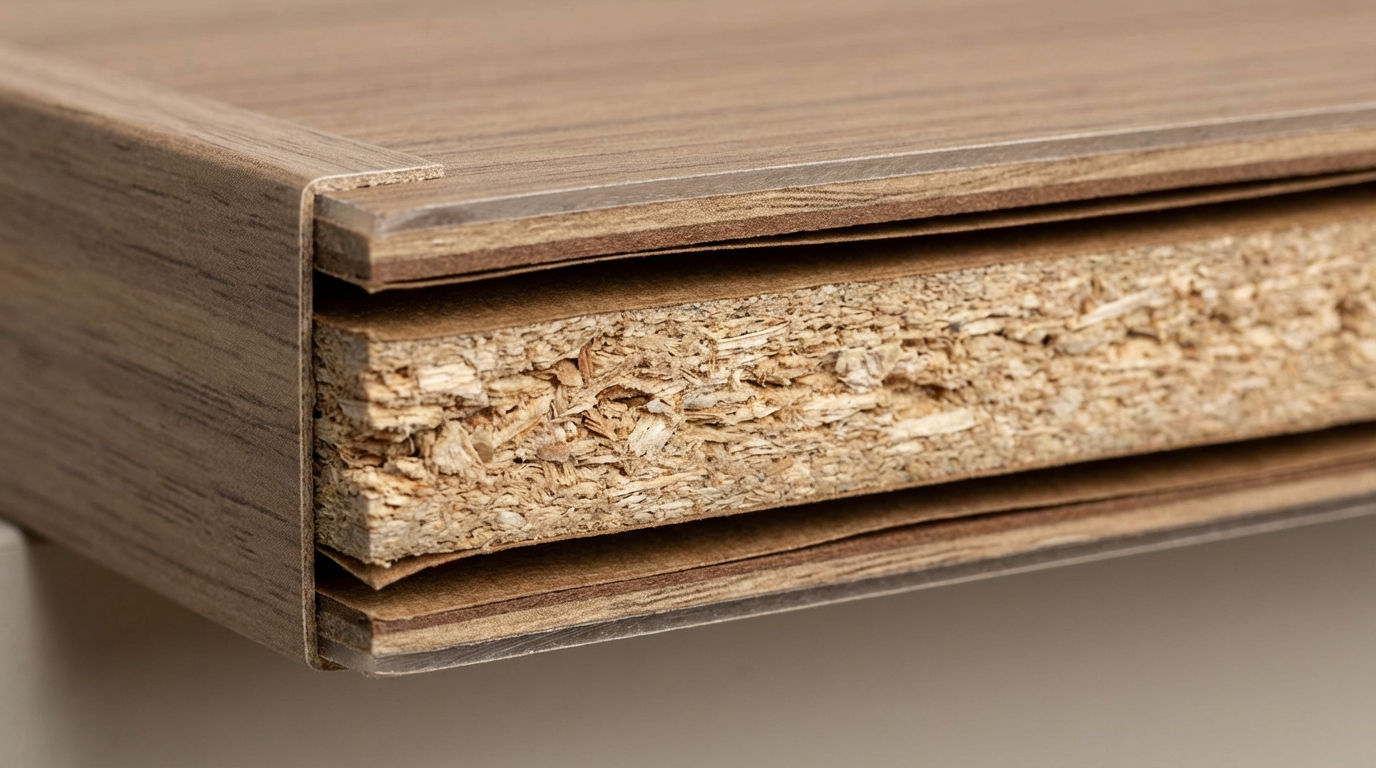
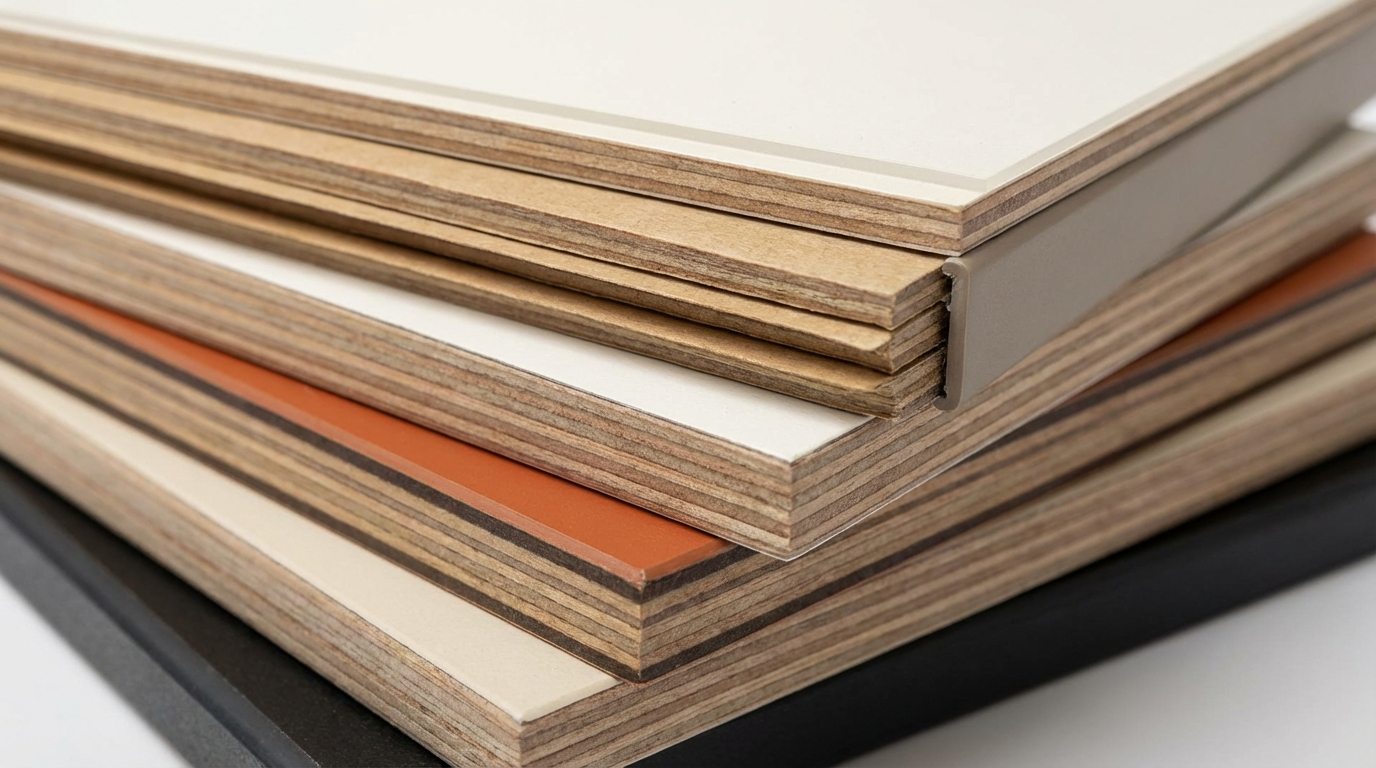
Glossy kitchen laminate refers to high-pressure laminate (HPL) sheets manufactured with a highly reflective top layer that creates a mirror-like sheen. These laminates are produced by compressing multiple layers of kraft paper saturated with phenolic resin, topped with a decorative paper layer and a protective melamine overlay. The glossy finish is achieved through specialised pressing techniques that create varying degrees of reflectivity, from semi-gloss to ultra-high-gloss (often marketed as HD gloss or super gloss).
In the Indian market, glossy laminates typically come in standard sheet sizes of 8 feet by 4 feet, with thicknesses ranging from 0.7mm to 1.5mm for most kitchen applications. The laminate itself is not structural—it must be bonded to a substrate such as plywood, MDF, HDHMR, or particle board to create the final cabinet shutter or panel.
How Is Glossy Laminate Different from Acrylic or PU Finish?
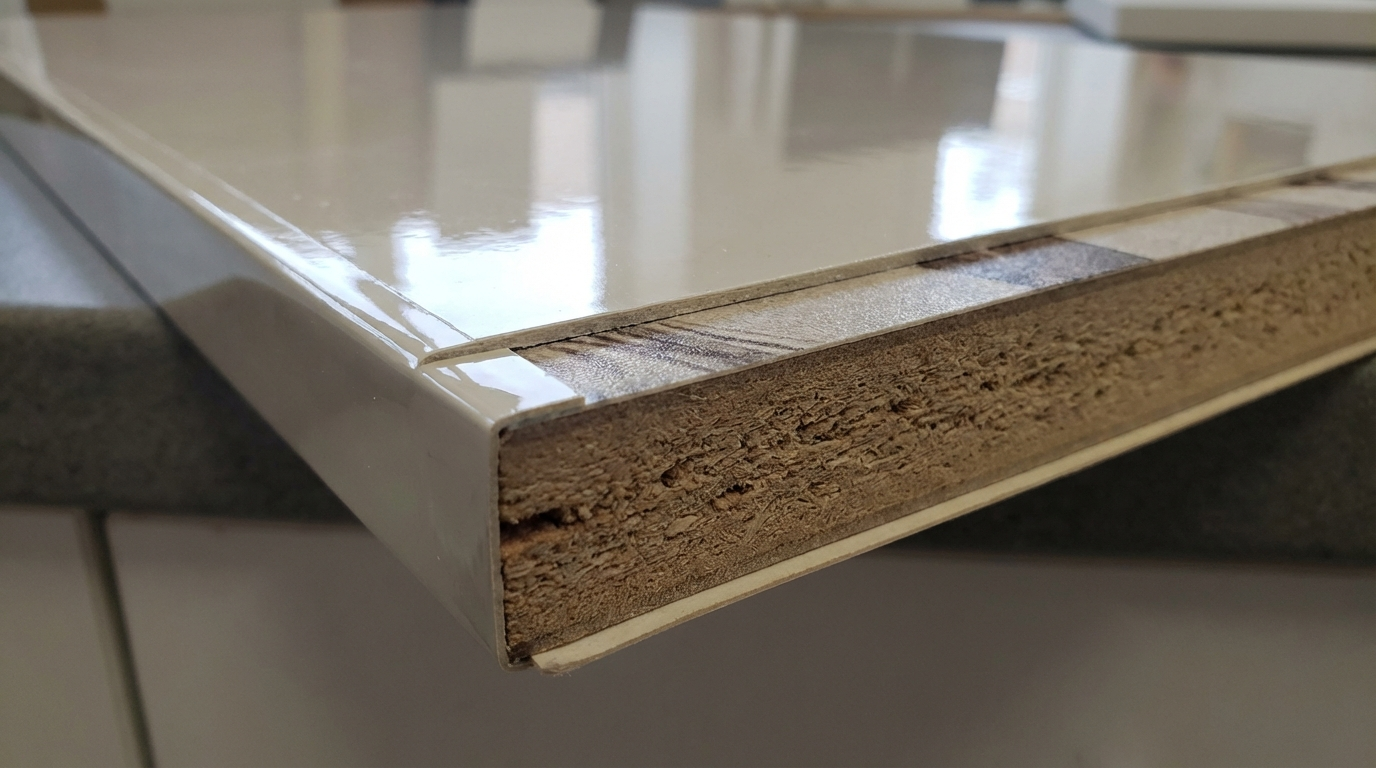
Glossy laminate is often confused with acrylic sheets or polyurethane (PU) paint finishes because all three can deliver a shiny surface. However, laminate is a pre-manufactured sheet applied with adhesive, while acrylic involves bonding a thick acrylic panel to the substrate, and PU is a spray-applied paint finish requiring controlled factory conditions. Glossy laminates are more affordable than acrylic, easier to source than factory-applied PU, and can be installed by skilled carpenters on-site. The trade-off is that laminate has visible edge lines where the sheet meets the substrate, whereas acrylic and PU can achieve seamless edges more easily.
Why Glossy Laminates Matter in Indian Kitchens
Indian kitchens present unique challenges that directly affect how glossy laminates perform. Understanding these factors helps you make informed decisions rather than discovering problems after installation.
Does Indian Monsoon Humidity Affect Glossy Laminates?
The laminate surface itself is moisture-resistant and will not absorb water or swell. However, the substrate underneath—particularly MDF or particle board—can absorb moisture through unsealed edges or poor-quality edge banding. During monsoon months in coastal cities like Mumbai, Chennai, or Kochi, relative humidity regularly exceeds 80%. If cabinet shutters have exposed edges or if the kitchen lacks exhaust ventilation, moisture ingress through the substrate edges causes swelling, warping, and eventual delamination. The glossy surface amplifies these defects visually because warping becomes immediately noticeable on a reflective surface.
Prevention requires proper edge banding (PVC or ABS strips sealed with quality adhesive), ensuring the substrate is stored in dry conditions before fabrication, and installing adequate kitchen exhaust to reduce humidity near the cooking zone.
How Does Oil and Spice Residue Affect Glossy Surfaces?
Indian cooking involves significant oil splatter and airborne spice particles. On glossy surfaces, these deposits are highly visible—oil films reduce the shine, and turmeric can temporarily stain the surface if not cleaned promptly. The good news is that quality glossy laminates have non-porous surfaces that resist stain absorption when cleaned regularly. A simple wipe with a damp microfibre cloth removes most residue. The key is frequency: daily wiping prevents buildup that becomes harder to remove over time.
Practical Use Cases: What Works and What Fails
Not every kitchen surface is equally suited to glossy laminates. The table below provides application-specific guidance based on real-world performance in Indian conditions.
| Application | Recommended Thickness | Finish Notes | Risk Notes |
|---|---|---|---|
| Wall-mounted upper cabinets | 0.8mm–1.0mm HPL | Ideal for glossy finish; reflects light beautifully | Low risk; minimal moisture exposure; easy to clean |
| Base cabinet shutters | 1.0mm–1.25mm HPL | Glossy works but shows fingerprints heavily | Higher wear; consider matte or textured for handles area |
| Kitchen island panels | 1.0mm HPL minimum | Stunning visual impact | Vulnerable to bumps and scratches at knee height |
| Tall unit shutters (pantry) | 1.0mm HPL | Excellent for seamless modern look | Large panels show warping more; ensure rigid substrate |
| Sink base cabinet | 1.0mm HPL on BWR/marine ply or HDHMR | Glossy possible but higher maintenance | High moisture zone; edge sealing critical; silicone joints needed |
| Countertop surface | Not recommended | Glossy laminates scratch easily with utensils | Use granite, quartz, or solid surface instead |
| Backsplash/dado area | 0.8mm–1.0mm HPL | Good for seamless look; wipeable | Heat exposure near hob; maintain 6-inch gap from flame |
Design Ideas You Can Actually Build
Below are practical glossy laminate design concepts organised by kitchen style and element. Each includes material logic and India-specific considerations.
Modern Minimalist Kitchens
- All-white glossy upper cabinets with handleless push-to-open mechanisms: Use 1.0mm white HD gloss laminate on 18mm HDHMR; aluminium J-profile for edges; maximises light reflection in small kitchens.
- Grey-tone glossy shutters with matte black countertop: Neutral grey HD gloss on uppers, charcoal matte on base units; reduces fingerprint visibility on lower cabinets.
- Single accent wall in bold glossy colour: Crimson or deep blue glossy laminate panel behind open shelving; adds depth without overwhelming.
Contemporary Indian Kitchens
- Wood-grain glossy laminates for a warm modern feel: Teak or walnut pattern in high-gloss finish; pairs well with brass hardware and marble-look countertops.
- Two-tone glossy design: Lighter shade on wall units, darker complementary shade on base units; visually grounds the space.
- Glossy laminate on tall pantry unit with internal pull-outs: Maximises storage while maintaining seamless exterior; ensure proper ventilation inside pantry.
Compact Apartment Kitchens
- Mirror-finish glossy laminate to expand visual space: Ultra high-gloss white or cream on all shutters; combine with under-cabinet lighting for maximum effect.
- Glossy upper cabinets reaching ceiling: Eliminates dust-collecting gap above cabinets; requires stable substrate and precise installation.
- Open shelving combined with glossy closed cabinets: Reduces visual weight while maintaining reflective aesthetic.
Island and Peninsula Designs
- Waterfall edge island with glossy laminate panels: Laminate wraps from countertop edge down the sides; use 1.25mm thickness for durability at edges.
- Breakfast counter with glossy front panel: Easy to wipe; avoid in homes with young children who kick the panel surface.
Backsplash and Wall Applications
- Full-height glossy backsplash from counter to upper cabinets: Eliminates grout lines; seamless wipe-down; maintain 150mm minimum distance from gas hob flame.
- Accent strip of metallic glossy laminate: Shimmer or brushed-metal finish laminate as horizontal band; creates visual interest.
- Glossy laminate on kitchen-side partition wall: Creates continuity with cabinet design; protects wall from splashes.
Price Range and Cost Drivers for Glossy Kitchen Laminates
Glossy laminate sheet prices in India typically range from approximately ₹1,800 to ₹4,500 per 8×4 feet sheet, depending on brand tier, gloss level, and surface technology. Ultra high-gloss or HD gloss variants command premium pricing compared to standard gloss finishes. Anti-fingerprint glossy laminates, which have a special coating to reduce smudge visibility, can cost 20–40% more than regular glossy sheets.
What Factors Drive Glossy Laminate Costs?
Several factors influence the final cost beyond the base sheet price:
- Gloss level: Standard gloss is most affordable; HD gloss and super-gloss premium cost more due to manufacturing complexity.
- Special coatings: Anti-fingerprint, antibacterial, or scratch-resistant coatings add 15–40% to sheet cost.
- Thickness: Thicker laminates (1.0mm and above) cost more but offer better durability and edge finishing.
- Substrate choice: The laminate bonds to plywood, HDHMR, or MDF—each has different costs. BWR plywood costs more than MDF but performs better in humid kitchens.
- Edge banding: PVC edge banding matched to glossy laminate colour costs ₹15–40 per running metre; laser-edge or seamless edge banding costs significantly more.
- Installation labour: Skilled carpenters charge ₹80–150 per square foot for laminate application; CNC-cut modular units cost more but ensure precision.
- City and logistics: Metro city rates differ from tier-2 towns; transportation and dealer margins affect final pricing.
Budget Estimator: 10×8 Feet Kitchen Shutter Area
For a typical L-shaped kitchen with approximately 80 square feet of shutter area:
- Laminate sheets: ~3–4 sheets at ₹2,500 average = ₹7,500–10,000
- Substrate (18mm BWR ply): ~80 sq ft at ₹85/sq ft = ₹6,800
- Edge banding: ~120 running ft at ₹25/rft = ₹3,000
- Adhesive and consumables: ₹2,000–3,000
- Labour (cutting, lamination, fitting): ~80 sq ft at ₹120/sq ft = ₹9,600
- Approximate total for shutters only: ₹28,000–35,000
This excludes carcass, hardware, countertop, and accessories. Actual costs vary significantly based on design complexity, hardware choices, and local market conditions.
How to Ask for a Quote: Checklist
- Specify exact laminate brand, code, and finish (standard gloss vs HD gloss)
- Confirm substrate type and thickness (18mm BWR ply, HDHMR, etc.)
- Clarify edge banding type (matching PVC, ABS, or exposed edge)
- Request breakdown: material cost vs labour cost vs hardware
- Ask about wastage allowance (typically 8–12% for cutting)
- Confirm warranty terms on workmanship separately from material warranty
Decision Framework: Choosing the Right Finish for Your Kitchen Conditions
Use this framework to match your specific kitchen conditions to the most suitable material and finish combination.
| Kitchen Condition | Recommended Approach | What to Verify |
|---|---|---|
| High humidity zone (coastal city, poor ventilation) | Glossy laminate on HDHMR or marine ply; PVC edge banding sealed with hot-melt adhesive; consider matte for base cabinets | Verify substrate is acclimatised; check edge banding seal continuity |
| Dry climate, well-ventilated kitchen | Glossy laminate on standard BWR ply; standard edge banding acceptable | Ensure ply is ISI-marked BWR; check laminate batch consistency |
| Heavy daily use (large family, frequent cooking) | HD gloss with anti-fingerprint coating on uppers; matte or textured on base units and handle zones | Test anti-fingerprint claim with actual touch; verify scratch resistance grade |
| Tight budget, basic kitchen | Standard gloss laminate on commercial MDF; simple PVC edge tape | Accept visible edge lines; avoid wet zones; ensure MDF is stored dry |
| Fast delivery requirement | Pre-laminated boards (factory-applied) or modular kitchen with stock colours | Verify stock availability; check for colour batch matching across units |
| High scratch risk (rental property, commercial pantry) | Consider matte or textured laminate instead; if glossy required, use thicker (1.25mm) grade | Request scratch resistance test certificate; plan for touch-up options |
| Design-forward, showpiece kitchen | Ultra HD gloss or mirror-finish laminate; seamless edge banding; handleless design | Budget for premium pricing; plan maintenance routine; ensure precise CNC cutting |
Common Buyer Mistakes and How to Avoid Them
Understanding frequent errors helps you sidestep problems that others have encountered with glossy kitchen laminates in Indian conditions.
Mistake 1: Choosing Glossy Laminates for Countertops
Glossy laminates scratch easily when utensils, vessels, or cutting boards are placed directly on them. Within weeks, a network of fine scratches dulls the surface. Use granite, quartz, or solid surface materials for countertops instead.
Mistake 2: Ignoring Edge Sealing in Humid Kitchens
Exposed substrate edges near sinks or in coastal cities absorb moisture, causing swelling and delamination. Insist on full PVC or ABS edge banding on all edges, including hidden ones inside cabinets.
Mistake 3: Selecting Dark Glossy Colours Without Considering Fingerprints
Dark glossy surfaces—black, deep brown, navy—show fingerprints, water spots, and dust far more than lighter shades. If you prefer dark tones, opt for anti-fingerprint coated versions or accept frequent wiping.
Mistake 4: Using Incompatible Substrates
Bonding glossy laminate to low-grade particle board or plain MDF in kitchen environments leads to premature failure. Specify BWR-grade plywood, HDHMR, or moisture-resistant MDF for any cabinet near water sources.
Mistake 5: Not Acclimatising Materials Before Fabrication
Laminate sheets and substrates stored in different humidity conditions can expand or contract after bonding, causing warping. Store materials at the installation site for 48–72 hours before cutting and lamination.
Mistake 6: Expecting Seamless Edges Without Premium Processes
Standard edge banding leaves a visible line where laminate meets edge tape. If you want truly seamless edges, budget for laser-edge banding or consider acrylic sheets instead. Set realistic expectations during design discussions.
Mistake 7: Placing Glossy Laminate Directly Adjacent to Gas Hob
Sustained heat near gas burners can damage laminate surfaces and adhesive bonds. Maintain minimum 150mm gap between hob edge and laminate panels; use heat-resistant materials like stainless steel or tiles in the immediate heat zone.
Mistake 8: Overlooking Batch Colour Variation
Laminate sheets from different production batches may have subtle colour differences visible under certain lighting. Order all sheets for a project from the same batch; verify batch numbers before accepting delivery.
Mistake 9: Using Abrasive Cleaners
Scrubbing glossy laminates with steel wool, abrasive powders, or harsh chemicals damages the glossy layer permanently. Use only soft microfibre cloths and mild soap solutions for cleaning.
Failure Modes and Fixes
Even with careful selection, problems can occur. Understanding failure modes helps in prevention and remediation.
Failure Mode 1: Edge Swelling and Delamination
Symptom: Edges near sinks or in humid areas show bubbling, lifting, or visible swelling.
Likely root cause: Moisture ingress through poorly sealed edges or exposed substrate cuts.
Prevention: Use quality PVC/ABS edge banding with hot-melt adhesive; apply silicone sealant at joints near water sources; ensure exhaust ventilation is operational.
If already happening: Replace affected shutters; re-seal all edges; improve ventilation; consider moisture-resistant substrate for replacement panels.
Failure Mode 2: Surface Scratching and Dulling
Symptom: Fine scratches accumulate, reducing reflectivity; surface appears hazy.
Likely root cause: Abrasive cleaning, dragging objects across surface, or using laminate in countertop applications.
Prevention: Use soft cloths only; avoid placing hard objects directly on surfaces; never use glossy laminate for countertops.
If already happening: Minor scratches cannot be repaired on laminate; consider applying a thin protective film; for severe cases, replace the shutter.
Failure Mode 3: Warping of Large Panels
Symptom: Tall unit doors or large panels curve or bow, creating gaps when closed.
Likely root cause: Substrate too thin for panel size; uneven moisture absorption; laminate applied to one side only.
Prevention: Use minimum 18mm thick substrate for panels over 600mm; apply balancing laminate on back surface; acclimatise materials before fabrication.
If already happening: Minor warping can sometimes self-correct with climate stabilisation; severe warping requires panel replacement with proper substrate thickness.
Failure Mode 4: Adhesive Failure and Bubbling
Symptom: Bubbles appear under laminate surface; sections lift without edge involvement.
Likely root cause: Insufficient adhesive application; substrate surface not cleaned before bonding; adhesive not compatible with substrate.
Prevention: Use recommended adhesive type; ensure substrate is clean, dry, and lightly sanded; apply even adhesive coverage; use proper roller pressure during bonding.
If already happening: Small bubbles can sometimes be flattened with heat and pressure by professionals; large areas require re-lamination.
Failure Mode 5: Colour Fading Near Windows
Symptom: Portions of laminate exposed to direct sunlight appear lighter than shaded areas.
Likely root cause: UV degradation of decorative layer pigments; not all laminates have UV-stable coatings.
Prevention: Request UV-resistant laminate grades for sun-exposed areas; use window films or blinds to reduce direct sunlight.
If already happening: Fading is irreversible; affected panels must be replaced; prevent recurrence with UV protection measures.
Failure Mode 6: Chipping at Edges and Corners
Symptom: Laminate chips away at corners or edges, exposing substrate beneath.
Likely root cause: Impact damage; poor edge banding allowing moisture entry that weakens bond; brittle laminate grade.
Prevention: Use thicker laminate (1.0mm+) for high-traffic areas; ensure robust edge banding; avoid sharp impacts during use and installation.
If already happening: Minor chips can be touched up with colour-matched markers (cosmetic fix only); significant chipping requires shutter replacement.
Quality Checks You Can Do Without Lab Tests
You do not need laboratory equipment to assess laminate quality. These practical checks help you evaluate materials and workmanship at various stages.
Before Buying: Visual and Physical Checks
- Surface uniformity: Hold sheet at an angle under good lighting; look for waves, scratches, or dull spots in the glossy finish.
- Colour consistency: Compare multiple sheets from the proposed batch; check for shade variations.
- Edge condition: Inspect sheet edges for chips, cracks, or delamination layers.
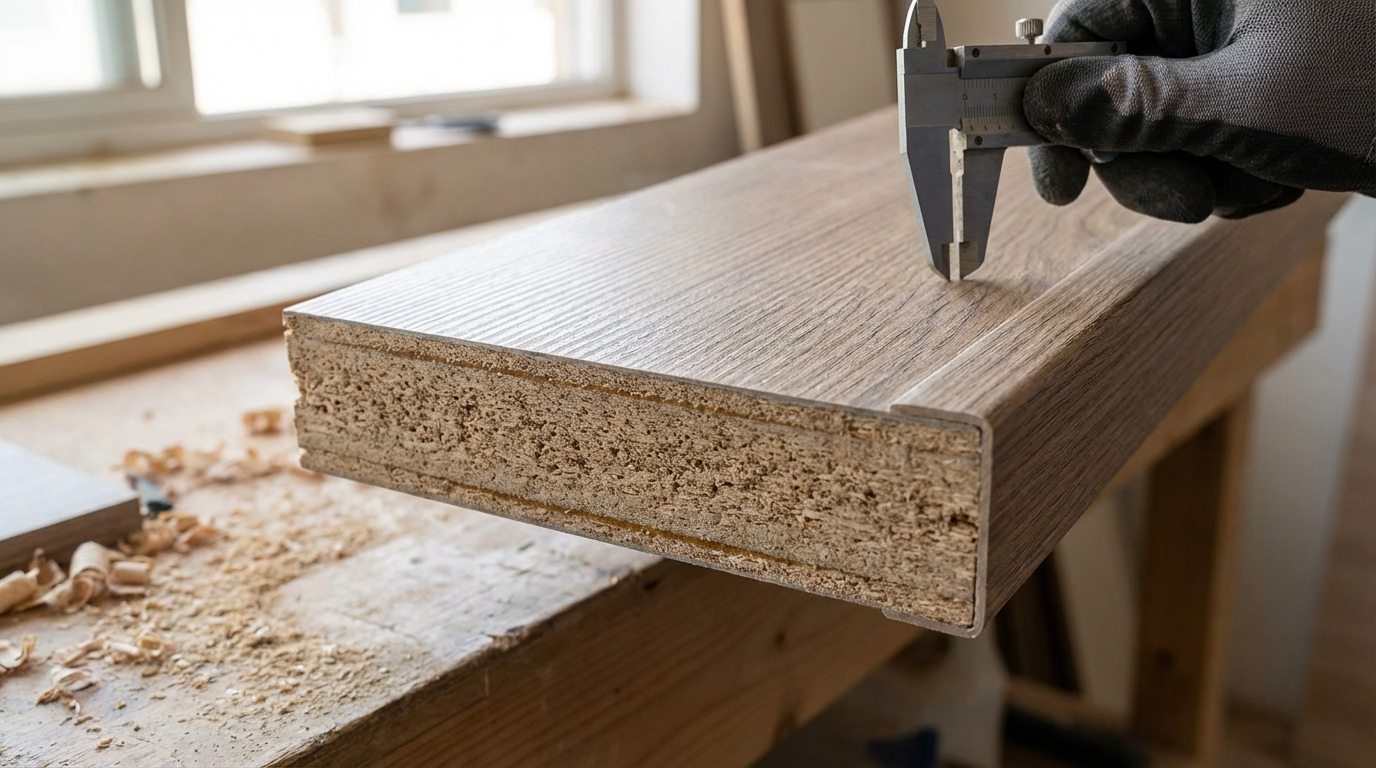
- Thickness verification: Measure with vernier caliper at multiple points; should match stated thickness ±0.05mm.
- Back surface: Should have uniform sanding marks for adhesive grip; no smooth or contaminated areas.
- Flexibility test: Quality laminate should bend slightly without cracking; brittle sheets indicate quality issues.
Questions to Ask Before Purchase
- What is the gloss level rating (60°, 85°, or higher gloss units)?
- Does this laminate have anti-fingerprint coating?
- What is the scratch resistance grade?
- Is this batch UV-stabilised?
- Can you provide batch numbers for all sheets?
- What adhesive does the manufacturer recommend?
After Cutting: Workmanship Checks
- Clean cuts: Edges should be smooth without chips; router-finished edges are superior to saw-cut edges.
- Dimensional accuracy: Cut pieces should match drawings within 1mm tolerance.
- Edge banding alignment: Band should be flush with laminate surface; no overhang or underhang.
- No adhesive squeeze-out: Excess adhesive on visible surfaces indicates poor technique.
After Installation: Final Inspection
- Door alignment: All shutters should align evenly; gaps should be uniform (typically 2–3mm).
- Soft-close function: Hinges should operate smoothly without binding or resistance.
- Surface cleanliness: No adhesive residue, fingerprints, or protective film remnants.
- Edge seal continuity: Run finger along all edges to feel for gaps or lifting.
- Level check: Place level on horizontal surfaces; counters and shelves should be true.
Persona-Specific Tips
For Homeowners: Durability and Cleaning Guidelines
Do:
- Wipe glossy surfaces daily with dry or slightly damp microfibre cloth
- Clean spills immediately, especially turmeric, oil, and acidic substances
- Use exhaust fan during and after cooking to reduce humidity and oil deposition
- Open cabinet doors occasionally to allow air circulation inside
- Apply silicone sealant around sink cutouts if you notice any moisture exposure
Don't:
- Use abrasive scrubbers, steel wool, or harsh chemical cleaners
- Place hot vessels directly on laminate surfaces (use trivets)
- Drag heavy objects across surfaces
- Allow water to pool at edges or in cabinet interiors
- Ignore early signs of edge lifting—address immediately
For Carpenters: Fabrication Best Practices
- Cutting: Use sharp TCT blades (60+ teeth) at high speed with controlled feed rate; support sheet fully to prevent chipping.
- Edge preparation: Rout all edges after cutting; slight chamfer prevents chipping during edge banding.
- Lamination: Apply adhesive evenly using roller; allow proper tack time before bonding; use J-roller or vacuum press for bubble-free results.
- Edge banding: Use hot-melt edge bander for consistent results; trim flush with sharp blade; avoid over-heating which causes gloss reduction.
- Hinge boring: Use sharp Forstner bits; bore on flat surface with backing board to prevent chip-out on laminate face.
- Handling: Store sheets flat; use soft packing between glossy surfaces; avoid dragging sheets.
- Acclimatisation: Keep materials at site for 2–3 days before working, especially during monsoon months.
For Architects and Designers: Specification Guidance
- Specify gloss level numerically (e.g., 85+ GU at 60°) rather than descriptive terms like "high gloss"
- Include anti-fingerprint coating requirement for dark-coloured glossy laminates
- Detail substrate specifications separately: type, thickness, grade, and edge treatment
- Specify minimum laminate thickness (recommend 1.0mm for kitchen applications)
- Include edge banding specifications: material, thickness, colour matching, application method
- Note ventilation requirements for kitchen design, especially in humid climates
- Specify distance from heat sources (hob, oven) for laminate panels
- Consider specifying matte or textured finishes for high-touch zones to reduce maintenance burden
For OEM and Modular Kitchen Manufacturers: Quality Control Points
- Incoming material inspection: Check batch numbers, measure thickness, inspect surface quality before accepting laminate consignments.
- Storage conditions: Climate-controlled storage with 45–55% RH; sheets stored flat with interleaving paper.
- Process control: Calibrated edge banding machines; documented adhesive application procedures; regular blade replacement schedule.
- In-process inspection: Dimensional check after cutting; edge banding adhesion check; surface quality check post-lamination.
- Final inspection: 100% visual inspection for surface defects; alignment and fitting check before packing.
- Documentation: Retain batch records for traceability; include care instructions with delivery.
- Reducing returns: Photograph all units before dispatch; clear installation guidelines for site teams; specify orientation marking for pattern laminates.
Comparison: Glossy Laminate vs Other Kitchen Finishes
This comparison helps you evaluate glossy laminate against alternative finishes commonly available in the Indian market.
| Parameter | Glossy Laminate | Matte Laminate | Acrylic | PU Paint Finish |
|---|---|---|---|---|
| Visual appeal | High reflectivity; modern look | Subtle; hides imperfections better | Deepest gloss; seamless edges possible | Smooth; customisable sheen levels |
| Fingerprint visibility | High (especially dark colours) | Low | Very high | Medium |
| Scratch resistance | Moderate | Good | Low to moderate | Moderate to good |
| Moisture resistance | Good (surface); edge sealing critical | Good | Excellent (if edge sealed) | Good |
| Cost (relative) | ₹₹ | ₹₹ | ₹₹₹₹ | ₹₹₹ |
| Repair ease | Replace entire panel | Replace entire panel | Replace entire panel | Can be re-sprayed (factory) |
| Availability in India | Excellent; wide variety | Excellent | Good in metros | Limited; factory-only application |
| Site installation | Possible by skilled carpenter | Possible by skilled carpenter | Requires precision; better factory-fitted | Factory-only |
FAQs
Is glossy laminate suitable for Indian kitchens with heavy frying and cooking?
Glossy laminate can work well in Indian kitchens when installed with proper ventilation and maintained with regular cleaning. The non-porous surface resists oil and spice absorption, making it easier to wipe clean compared to porous materials. However, oil films and turmeric residue become more visible on reflective surfaces than on matte finishes. Daily wiping with a damp microfibre cloth prevents buildup. For best results, use glossy finishes on upper cabinets that are less exposed to direct splatter, and consider matte or textured laminates for base cabinets near the cooking zone.
How do I maintain the shine on glossy kitchen laminate shutters?
Maintaining glossy laminate shine requires consistent but simple care. Use a soft microfibre cloth for daily dusting—avoid paper towels or rough fabrics that can create micro-scratches over time. For deeper cleaning, use mild dish soap diluted in water, wipe with a damp cloth, and immediately dry with a clean soft cloth. Never use abrasive powders, scouring pads, or harsh chemicals like bleach or acetone. Anti-fingerprint coated laminates reduce smudge visibility but still benefit from regular wiping. If your kitchen has hard water, wipe water spots immediately to prevent mineral deposits that are harder to remove later.
Can glossy laminate be used near the gas hob or cooking range?
Glossy laminate should not be placed immediately adjacent to gas burners or heat sources. Sustained high temperatures can damage the laminate surface, cause discolouration, and weaken the adhesive bond between laminate and substrate. Maintain a minimum gap of 150mm between the edge of gas hob burners and any laminate surface. For the backsplash area directly behind the hob, consider heat-resistant materials like ceramic tiles, stainless steel, or tempered glass for the immediate heat zone, with laminate continuing beyond this protected area.
What substrate should I use under glossy laminate in humid coastal cities?
In coastal cities like Mumbai, Chennai, Kochi, or Visakhapatnam, where humidity regularly exceeds 75–85%, substrate choice becomes critical for laminate longevity. HDHMR (high-density high-moisture-resistant) boards or BWR (boiling water resistant) plywood are recommended over standard MDF or commercial plywood. Marine-grade plywood offers superior moisture resistance for cabinets near sinks. Regardless of substrate chosen, comprehensive edge sealing with PVC or ABS edge banding applied using hot-melt adhesive is essential. Ensure kitchen exhaust ventilation operates effectively to reduce ambient humidity during and after cooking.
Why does my glossy laminate show scratches even with careful use?
Glossy surfaces inherently reveal imperfections more readily than matte finishes because the reflective surface creates contrast that highlights any surface disruption. Fine scratches can result from abrasive cleaning materials, dust particles trapped under cleaning cloths, sliding objects across surfaces, or simply from regular contact over time. Higher-quality laminates typically have better scratch resistance than budget options. If scratch visibility concerns you, consider HD gloss laminates with enhanced surface hardness, anti-fingerprint coatings (which sometimes also offer scratch resistance), or using glossy finishes only on less-touched surfaces like upper cabinets.
How long do glossy kitchen laminates typically last?
Well-maintained glossy laminates in properly ventilated kitchens with appropriate substrate and edge sealing can last 10–15 years or longer without significant degradation. The laminate surface itself is durable—failure typically occurs at edges due to moisture ingress, from substrate deterioration, or from accumulated surface damage. Kitchens in high-humidity environments without adequate ventilation may see problems within 5–7 years. Regular maintenance, prompt attention to any edge lifting or moisture issues, and avoiding abrasive cleaning significantly extend laminate lifespan.
Can I get seamless edges with glossy laminate like acrylic finishes?
Standard glossy laminate application always shows a visible line where the surface laminate meets the edge banding material, even when colours are matched. Laser-edge banding technology minimises this line by fusing the edge band to the panel using heat, creating a near-seamless appearance, but the joint remains visible on close inspection. If truly seamless edges are essential to your design, consider acrylic panels which can be edge-profiled after bonding, or factory-applied PU finishes. For most residential kitchens, quality colour-matched edge banding provides an acceptable appearance at significantly lower cost than alternatives.
Is glossy laminate more expensive than matte laminate?
Glossy and matte laminates in standard grades are typically priced similarly, with differences often reflecting brand tier rather than finish type. However, premium glossy variants—HD gloss, super gloss, mirror finish—command higher prices than standard gloss or matte equivalents due to more complex manufacturing processes. Anti-fingerprint coated glossy laminates also cost more than uncoated versions. When budgeting, compare like-for-like specifications: standard gloss versus standard matte from the same brand and thickness. The most significant cost variables are typically substrate quality, edge banding type, and fabrication complexity rather than laminate finish choice.
What is the difference between HD gloss and standard gloss laminate?
HD gloss (high-definition gloss) laminates have higher reflectivity and sharper image clarity compared to standard gloss variants. The difference lies in the manufacturing process—HD gloss involves enhanced pressing techniques and premium surface coatings that create a mirror-like finish with greater depth. Visually, HD gloss appears more luxurious and reflects light more intensely. Standard gloss has noticeable sheen but less mirror-like reflection. HD gloss typically costs 15–30% more than standard gloss and may be marketed under different brand-specific names. The choice depends on budget and desired aesthetic intensity.
Can glossy laminate shutters be repaired if damaged?
Laminate repairs are limited compared to paintable surfaces. Minor scratches can sometimes be minimised using laminate repair markers or wax sticks that fill and colour-match the scratch, but these are cosmetic fixes visible on close inspection. Deep scratches, chips, or delamination cannot be effectively repaired—the affected shutter or panel must be replaced. This is why damage prevention through proper use, adequate edge sealing, and correct cleaning methods is important. When ordering modular kitchens, consider ordering one or two spare shutters in frequently touched sizes as future replacements if needed.
Should I use glossy laminate on both upper and lower kitchen cabinets?
Using glossy laminate on upper cabinets while selecting matte or textured finishes for lower cabinets is a practical approach that many designers recommend. Upper cabinets receive less direct contact, fewer fingerprints, and less exposure to splashes and bumps, making them ideal for showcasing glossy finishes. Lower cabinets face more wear: frequent handle contact, proximity to wet areas, and occasional kicks or bumps. Matte or textured laminates on base units hide fingerprints and minor abrasions better while complementing the glossy uppers. This combination balances aesthetics with practical maintenance considerations.
How do I choose the right glossy laminate colour for a small kitchen?
Lighter glossy colours maximise the space-expanding effect of reflective surfaces in compact kitchens. White, cream, light grey, or pale wood-tone glossy laminates reflect both natural and artificial light, creating an illusion of openness. Avoid dark glossy colours as primary finishes in small kitchens—while visually striking, they absorb light and can make spaces feel smaller. If you prefer darker tones, use them as accents: a dark glossy island front, or a single feature wall, balanced with lighter main cabinetry. Consider your kitchen's lighting conditions; north-facing kitchens with limited natural light benefit most from lighter reflective finishes.
Glossy kitchen laminates remain a popular and practical choice for Indian homes when selected and maintained thoughtfully. Understanding the material's characteristics, respecting its limitations, and following appropriate care practices ensures your kitchen delivers both the aesthetic appeal and the functional durability you expect from this versatile surfacing solution.
Disclaimer: This content is provided for general informational purposes based on industry practices and publicly available information. Product specifications, standards, prices, and availability may vary by manufacturer, region, and time. Readers should independently verify details with manufacturers, dealers, or qualified professionals before making purchase or construction decisions.
Want Plywood Suggestions?
Share a few details and a VIR MDF specialist will suggest suitable brands and connect you to responsive dealers.