Glossy Laminate Sheets – Complete Guide for Indian Buyers
Research-backed glossy laminate sheets breakdown with pros/cons, tables, and a clear decision checklist for Indian buyers and carpenters.

Note: This is independent informational content and is not affiliated with any manufacturer.
Quick Decision Summary
Best answer in one line: Glossy laminate sheets deliver a reflective, modern finish ideal for contemporary Indian interiors but require careful handling and proper edge sealing to prevent chipping and fingerprint visibility.
If you're in a hurry: Glossy laminates work best on flat surfaces in dry zones—wardrobes, TV units, and wall panels. They reflect light and make small rooms feel larger. However, they show fingerprints easily, chip at edges if cut poorly, and need skilled installation. For kitchens or high-traffic furniture, consider matte or textured alternatives unless you're prepared for regular wiping and professional edge banding.
- Choose glossy laminate if: You want a sleek, modern aesthetic; your room needs visual expansion through light reflection; surfaces won't face heavy scratching or abuse; you have access to skilled fabricators.
- Avoid glossy laminate if: The application is in a wet zone with direct water contact; you dislike frequent cleaning; edges will be exposed without proper sealing; budget doesn't allow for professional finishing.
What Glossy Laminate Sheets Actually Are
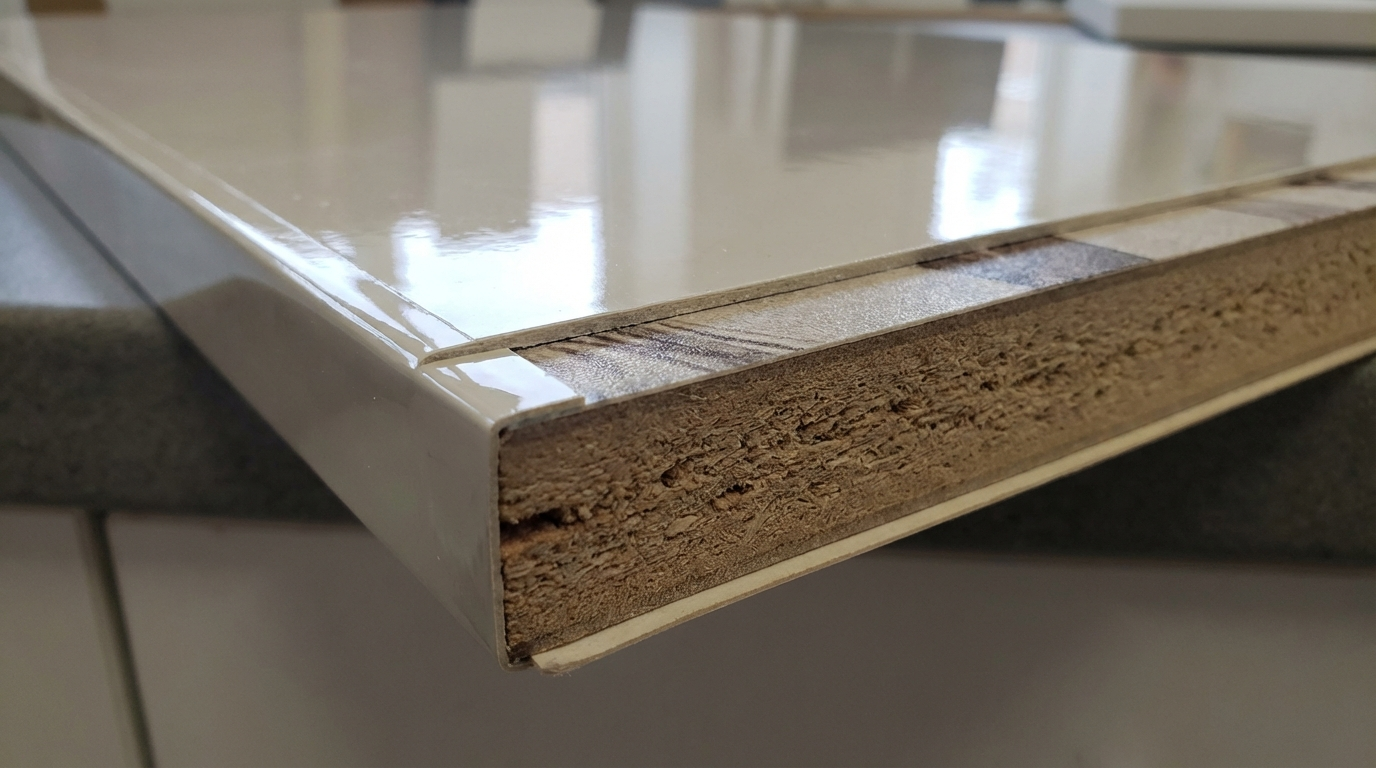
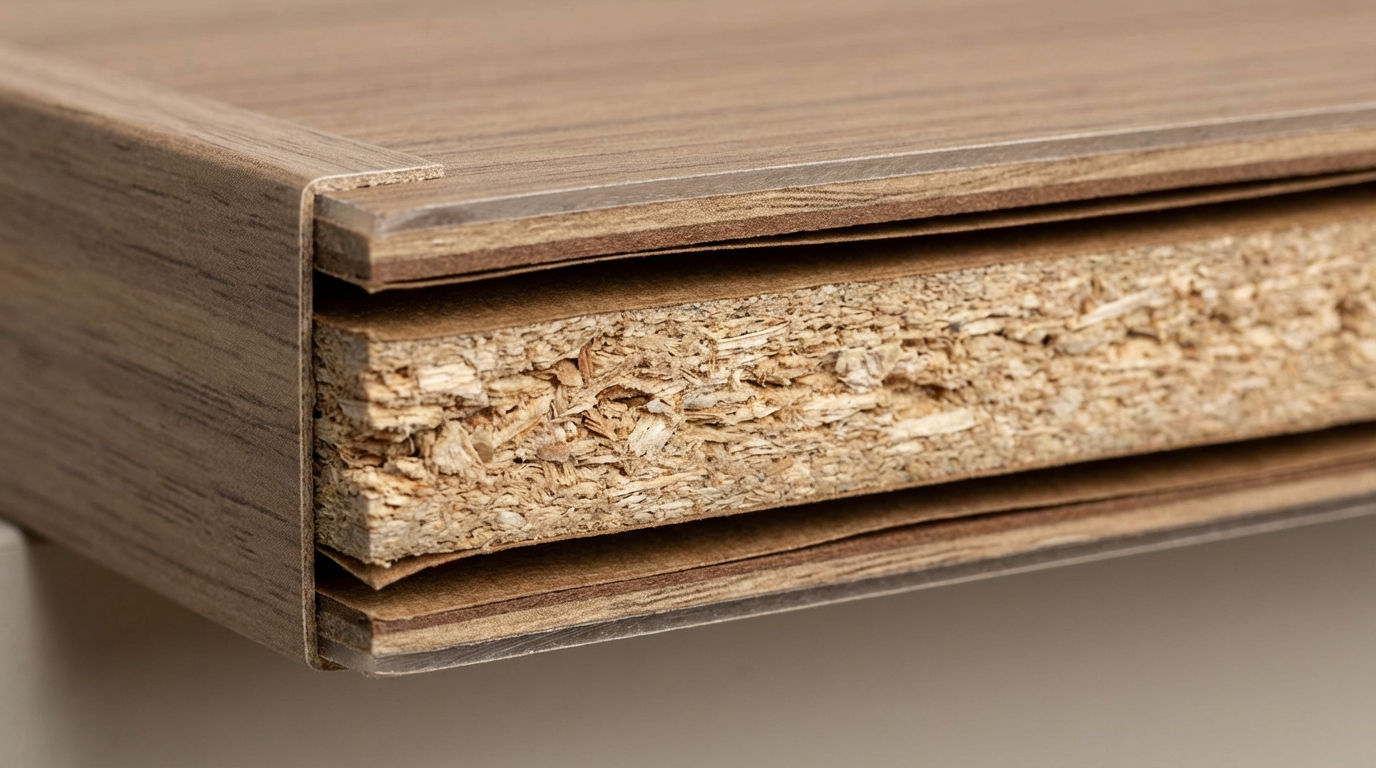
Glossy laminate sheets are decorative surfacing materials manufactured by pressing multiple layers of resin-impregnated paper under high heat and pressure. The top layer receives a high-gloss coating that creates the characteristic mirror-like sheen. These sheets are typically applied to substrates like MDF, plywood, or particle board to create finished furniture surfaces.
The glossy finish is achieved through specialised overlay papers and controlled curing processes. High-definition gloss variants (often called HD gloss) use advanced technology to deliver even higher reflectivity and surface clarity. Standard glossy laminates typically range from 0.8mm to 1.5mm thickness, while compact versions can go up to 6mm for self-supporting applications.
How is glossy laminate different from acrylic and PU finishes?
Glossy laminates are pre-manufactured sheets bonded to substrates using adhesives, while acrylic finishes involve coating panels with polymethyl methacrylate layers, and PU (polyurethane) is a spray-applied finish. Laminates offer consistent factory-controlled quality and are more affordable than acrylic. However, acrylic provides deeper gloss and better scratch recovery. PU allows custom colour matching but requires skilled spray application and controlled drying conditions. For most Indian residential projects, glossy laminates offer the best balance of cost, durability, and aesthetic appeal when professional acrylic or PU finishing isn't accessible.
Why Glossy Laminates Matter in Indian Homes and Sites
Indian interior conditions present unique challenges that directly affect glossy laminate performance. Understanding these factors prevents costly failures and ensures long-term satisfaction.
Monsoon and Humidity Considerations
During monsoon months, relative humidity in many Indian cities exceeds 80-90%. Glossy laminate sheets themselves are moisture-resistant at the surface, but the substrate beneath (MDF, plywood, or particle board) can absorb moisture through exposed edges. When edges aren't properly sealed, the core swells, causing the laminate to bubble or delaminate. Coastal cities like Mumbai, Chennai, and Kolkata face year-round humidity that accelerates this process.
Storage and Transport Realities
Glossy surfaces scratch easily during handling. In typical Indian supply chains, sheets pass through multiple handlers—manufacturers to distributors to dealers to carpenters. Each transition point risks surface damage. Sheets stored horizontally can develop pressure marks. Vertical storage against rough walls creates scratches. Always inspect sheets at the dealer before accepting delivery, specifically checking for surface scratches, edge chips, and moisture damage from improper warehouse storage.
Site Workmanship Impact
Glossy finishes reveal every imperfection in the substrate below. Uneven MDF surfaces, inadequate sanding, or air bubbles during lamination become visible as wavy reflections or bumps. Indian site conditions—dust, variable temperatures, rushed timelines—make achieving flawless glossy surfaces challenging. This is why professional fabricators with controlled workshop conditions typically deliver better results than on-site carpentry for glossy laminate work.
Price Range and Cost Drivers
Glossy laminate sheet prices in India vary significantly based on multiple factors. Understanding these helps you budget accurately and evaluate quotes.
Typical Price Ranges (2024-2025)
| Laminate Type | Price Range (per 8×4 ft sheet) | Price per sq ft (approximate) |
|---|---|---|
| Standard Glossy HPL (0.8mm) | ₹1,800 – ₹2,500 | ₹56 – ₹78 |
| HD Gloss Laminate (1.0mm) | ₹2,200 – ₹3,500 | ₹69 – ₹109 |
| Super Gloss/Mirror Finish | ₹3,000 – ₹4,500 | ₹94 – ₹141 |
| Anti-Fingerprint Glossy | ₹3,500 – ₹5,000 | ₹109 – ₹156 |
What factors drive glossy laminate costs up or down?
Several variables affect the final price you pay. Thickness matters—thicker sheets (1.0mm vs 0.8mm) cost more but offer better impact resistance. Surface technology adds cost; anti-fingerprint coatings, antibacterial properties, and higher gloss levels increase prices by 30-60%. Design complexity plays a role too—solid colours are typically cheaper than woodgrain or stone patterns with aligned textures. Brand positioning, logistics distance from manufacturing units, and dealer margins create city-wise variations. Mumbai and Delhi typically have more competitive pricing due to dealer competition, while tier-2 cities may see 10-20% premiums.
Budget Estimation Example: 6-Door Wardrobe
For a standard 8ft × 7ft wardrobe with 6 shutters:
- Total laminate surface area (both sides + edges): approximately 180-200 sq ft
- At mid-range glossy laminate (₹85/sq ft): ₹15,300 – ₹17,000 for laminate alone
- Add 10-15% for cutting wastage: ₹1,700 – ₹2,550
- Edge banding (40-50 running metres): ₹800 – ₹1,500
- Total laminate cost estimate: ₹17,800 – ₹21,050
This excludes substrate (MDF/plywood), hardware, labour, and fabrication charges.
How to Ask for a Quote: Specification Checklist
- Laminate brand and specific product line name
- Exact thickness (0.8mm/1.0mm/1.25mm)
- Finish type (standard gloss/HD gloss/super gloss/anti-fingerprint)
- Pattern code and batch number
- Price per sheet vs per sq ft (clarify measurement basis)
- Edge banding material and colour-matching confirmation
- Wastage percentage included or excluded
- Delivery charges and minimum order requirements
Types of Glossy Laminates and Where People Get Confused
The glossy laminate market includes several variants, and terminology confusion leads to wrong purchases. Here's clarity on what's actually available.
Standard Glossy HPL
High-pressure laminate with a reflective surface layer. Good for general furniture applications. Shows fingerprints moderately. Adequate scratch resistance for residential use.
HD Gloss Laminates
Enhanced manufacturing process delivers higher surface clarity and deeper reflections. Commands 20-40% premium over standard gloss. Better suited for showcase furniture and feature walls where visual impact matters.
Super Gloss/Mirror Finish
Maximum reflectivity approaching mirror-like appearance. Most fingerprint-prone. Reserved for accent applications where dramatic effect outweighs maintenance concerns.
Anti-Fingerprint (AFP) Glossy
Special surface treatment reduces visible fingerprints and smudges. Easier to maintain. Particularly valuable for kitchen cabinet doors and handles-adjacent areas.
Common Misunderstandings
- Glossy laminate ≠ Acrylic: Laminates are bonded sheets; acrylic is a coating system with different properties and price points.
- HD Gloss ≠ Standard Gloss: These are distinct product categories with different manufacturing and pricing, not interchangeable terms.
- Glossy ≠ Waterproof: The glossy surface resists water, but edges and substrates remain vulnerable without proper sealing.
- Thicker ≠ Always Better: For curved applications, thinner laminates (post-forming grades) are necessary; thick laminates won't bend.
- All brands ≠ Same quality: Surface hardness, colour consistency, and edge chip resistance vary significantly between manufacturers.
- Glossy ≠ High maintenance everywhere: With anti-fingerprint variants and proper placement, maintenance can be reasonable.
Practical Use Cases: What Works and What Fails
Glossy laminates excel in specific applications but create problems in others. This table guides appropriate selection.
| Application | Suitability | Recommended Thickness | Key Considerations | Risk Factors |
|---|---|---|---|---|
| Wardrobe shutters (bedroom) | Excellent | 0.8mm – 1.0mm | Light reflection expands visual space | Handle zone fingerprints; edge chipping during opening |
| Kitchen upper cabinets | Good | 1.0mm AFP variant | Anti-fingerprint essential; avoid near cooktop | Grease film accumulation; heat proximity damage |
| Kitchen base cabinets | Moderate | 1.0mm AFP variant | Prone to kicks, spills, moisture from floor mopping | Edge damage from water; scratch from utensils |
| TV unit doors | Excellent | 0.8mm – 1.0mm | Low-touch surface; visual impact high | Cable management areas need careful finishing |
| Feature walls/wall panels | Excellent | 0.8mm or compact grades | Maximum visual impact; minimal wear | Reflection of opposite walls; installation flatness critical |
| Study table tops | Poor | Not recommended | Writing causes scratches; reflection causes eye strain | Surface damage inevitable; glare problems |
| Bathroom vanities | Poor | Not recommended | Direct water contact; high humidity | Edge delamination; substrate swelling |
| Commercial reception desks | Good | 1.0mm – 1.25mm | Professional appearance; use AFP variant | High-touch zones need frequent cleaning |
Design Ideas You Can Actually Build
These applications work well with glossy laminates in typical Indian home conditions:
Living Room Applications
- Full-height TV unit with push-to-open shutters: White or grey HD gloss laminate on MDF; handleless design minimises fingerprint contact; PVC edge banding in matching colour
- Bar cabinet with glass shelving: Dark glossy laminate (walnut or black) creates drama; internal LED lighting reflects beautifully; use anti-fingerprint variant for door exteriors
- Wall-mounted floating shelves: Glossy laminate on 18mm MDF with concealed brackets; light colours expand space perception
- Feature wall behind sofa: Full-wall glossy panels in geometric patterns; requires perfectly flat wall preparation; compact laminate for durability
Bedroom Applications
- Sliding wardrobe with profile shutters: HD gloss laminate in soft colours (cream, pale grey); aluminium profiles hide edge laminate joints; full-length mirror panel combination
- Bed back panel: Padded sections with glossy laminate surrounds; creates luxury hotel aesthetic; soft-close mechanisms protect edges
- Dresser unit: Glossy white laminate with integrated lighting; avoid placing near windows to prevent glare interference
- Walk-in closet interiors: Glossy laminate on visible surfaces only; use melamine or matte for shelf interiors to reduce fingerprint concerns
Kitchen Applications
- Tall unit pantry doors: Anti-fingerprint glossy laminate; lighter colours hide dust better than dark; ensure proper ventilation behind unit
- Island front panels (non-cooking side): Glossy accent colour creates focal point; protect base with metal skirting; avoid pure white near food preparation
- Overhead lift-up shutters: Glossy finish reflects task lighting downward; hydraulic mechanisms reduce slam damage to edges
Office and Commercial Applications
- Reception desk fascia: Corporate colour HD gloss laminate; company logo possible via digital laminate options; cable management cutouts need careful edge sealing
- Conference room credenza: Glossy laminate doors with soft-close hinges; interior in contrasting matte finish for AV equipment visibility
- Retail display units: Super gloss white or black for premium merchandise presentation; museum-quality lighting to maximise reflection
Decision Framework: Which Finish for Which Condition
Use this framework to match your specific situation to the right glossy laminate choice—or identify when to avoid glossy altogether.
| Condition/Scenario | Recommended Choice | What to Verify |
|---|---|---|
| Wet zone (kitchen sink area, bathroom-adjacent) | Avoid glossy laminate; use marine plywood + PU paint or PVC boards | Substrate moisture resistance; edge sealing quality |
| Coastal city with year-round humidity | BWR-grade plywood substrate + glossy HPL; comprehensive edge sealing | Substrate grade certification; edge band adhesive quality |
| High-traffic commercial space | 1.0mm or thicker HD gloss with anti-fingerprint; consider compact laminate | Surface hardness rating; scratch recovery ability |
| Budget-conscious residential project | Standard glossy 0.8mm HPL on commercial plywood; prioritise visible surfaces only | Core colour consistency; surface defect inspection |
| Fast delivery timeline (under 2 weeks) | Stock colours from local dealers; avoid custom patterns or digital prints | Dealer inventory confirmation; batch colour consistency |
| High scratch risk (kids, pets) | Avoid glossy; choose matte or textured finishes | Scratch resistance specifications; sample scratch test |
| Curved/profile surfaces required | Post-forming grade glossy laminate (0.6mm-0.8mm flexible) | Minimum bend radius specification; heat forming capability |
| Premium appearance priority | HD gloss or super gloss with matching edge band; factory-finished panels | Edge band colour match; panel flatness; reflection uniformity |
Common Buyer Mistakes and How to Avoid Them
These errors occur repeatedly in Indian glossy laminate projects. Learning from them saves money and frustration.
Mistake 1: Ignoring Edge Banding Quality
Problem: Cheap PVC edge bands in non-matching colours or poor adhesion create visible seams and moisture entry points.
Solution: Insist on laser-edge or hot-melt edge banding with colour-matched tape. Verify edge adhesion by fingernail test—properly bonded edges shouldn't lift.
Mistake 2: Choosing Dark Glossy for High-Touch Areas
Problem: Dark colours (black, navy, deep brown) show every fingerprint, dust particle, and micro-scratch.
Solution: Reserve dark glossy finishes for low-touch surfaces. For frequently handled areas, use lighter colours or anti-fingerprint variants.
Mistake 3: Applying Glossy Laminate Near Cooking Zones
Problem: Heat, oil vapour, and steam damage glossy surfaces. Laminate near cooktops yellows and loses sheen over time.
Solution: Maintain minimum 450mm clearance between glossy surfaces and heat sources. Use stainless steel or heat-resistant materials for cooktop-adjacent areas.
Mistake 4: Not Inspecting Sheets Before Cutting
Problem: Surface defects, scratches, or colour variations become visible only after fabrication, causing disputes and waste.
Solution: Remove protective film and inspect under good lighting before accepting delivery. Check multiple sheets from the same batch for colour consistency.
Mistake 5: Using Standard MDF in Humid Zones
Problem: Regular MDF absorbs moisture through edges, swelling and distorting even with glossy surface laminate.
Solution: Use moisture-resistant MDF (green MDF) or BWR plywood for applications in humid zones or coastal locations.
Mistake 6: Cutting with Wrong Blades
Problem: Incorrect saw blades cause chipping on the glossy surface, creating rough edges that compromise appearance and durability.
Solution: Use carbide-tipped blades with 60+ teeth for laminate cutting. Score the laminate face before full cuts. Cut with the decorative side up on table saws, down on circular saws.
Mistake 7: Ignoring Batch Number Consistency
Problem: Different production batches of the same colour code can have visible shade variations when placed adjacent.
Solution: Order sufficient quantity from a single batch. Note batch numbers on delivery. If multiple batches are unavoidable, use different batches in non-adjacent locations.
Mistake 8: Skipping Acclimatisation Period
Problem: Laminate sheets stored in different humidity conditions may expand or contract after installation, causing bubbling or edge lifting.
Solution: Store sheets flat in the installation environment for 48-72 hours before fabrication. This allows moisture equilibration with site conditions.
Failure Modes and Fixes
Understanding how glossy laminates fail helps prevent problems and address issues early.
Failure Mode 1: Edge Delamination
Symptom: Laminate lifting away from substrate at edges, creating visible gaps.
Root Cause: Poor adhesive application, moisture ingress through unsealed edges, or using water-based adhesive in humid conditions.
Prevention: Use contact cement or PVA adhesive appropriate for conditions. Apply even pressure during bonding. Seal all edges with edge banding immediately.
If Already Happening: Inject fresh adhesive under lifted area using syringe. Apply clamping pressure for 24 hours. Once re-bonded, seal edge completely.
Failure Mode 2: Surface Bubbling
Symptom: Localised raised areas on laminate surface, visible under angled light.
Root Cause: Air trapped during lamination, substrate moisture releasing vapour, or adhesive insufficient in spots.
Prevention: Use roller to remove air during lamination. Ensure substrate moisture content below 12%. Apply adhesive uniformly without gaps.
If Already Happening: Small bubbles can sometimes be pressed flat with heat (warm iron over cloth) if adhesive is still workable. Large bubbles require panel replacement.
Failure Mode 3: Scratch Accumulation
Symptom: Network of fine scratches dulling the glossy appearance, especially visible under direct light.
Root Cause: Abrasive cleaning materials, dust particles during wiping, contact with rough objects.
Prevention: Clean only with microfiber cloths. Remove dust before wet cleaning. Keep surfaces clear of abrasive items.
If Already Happening: Light scratches can sometimes be reduced with laminate polish. Deep scratches are permanent—panel replacement is the only solution.
Failure Mode 4: Edge Chipping
Symptom: Small pieces breaking away from laminate edges, especially at corners.
Root Cause: Impact damage, poor cutting technique, or laminate brittleness from age/heat exposure.
Prevention: Use proper cutting tools. Install corner protectors on vulnerable furniture. Handle panels carefully during transport.
If Already Happening: Minor chips can be filled with colour-matched wax filler. Major chips require edge re-lamination or edge band replacement.
Failure Mode 5: Colour Fading
Symptom: Gradual colour change, especially in areas exposed to direct sunlight.
Root Cause: UV degradation of pigments and surface coating. More pronounced in darker colours.
Prevention: Avoid direct sunlight exposure. Use UV-filtering window films. Choose UV-resistant laminate grades for sun-exposed applications.
If Already Happening: Fading is irreversible. Replacing affected panels and adding UV protection prevents recurrence.
Failure Mode 6: Substrate Swelling
Symptom: Laminate surface becoming wavy or uneven, especially near edges and corners.
Root Cause: Moisture absorption by MDF or particle board substrate through unsealed edges or prolonged humidity exposure.
Prevention: Use moisture-resistant substrates. Seal all edges completely. Ensure proper ventilation in enclosed cabinets.
If Already Happening: Drying may partially reverse minor swelling, but significant damage requires panel replacement with moisture-resistant alternatives.
Quality Checks You Can Do Without Lab Tests
Practical inspection techniques help identify quality issues before they become expensive problems.
Before Buying: Dealer-Level Checks
- Surface uniformity: View sheet at 45-degree angle under bright light. Glossy surface should show even reflection without wavy distortions or dull patches.
- Edge inspection: Look at sheet edges. Clean, uniform layers indicate good manufacturing. Delamination, gaps, or irregular layers suggest quality issues.
- Colour consistency: Compare multiple sheets from the batch. Hold them adjacent under same lighting. Noticeable shade differences indicate batch inconsistency.
- Flexibility test: Gently flex the sheet. Quality laminates have consistent flexibility. Excessive brittleness or unusual softness indicates problems.
- Protective film check: Film should remove cleanly without leaving residue. Difficult removal or residue suggests storage age or temperature damage.
Red Flags to Walk Away From
- Sheets stored vertically leaning against walls (causes warping)
- Visible moisture damage on packaging or edges
- Dealer unable to provide batch information
- Significant price below market range (often indicates defects or outdated stock)
- Surface scratches visible even through protective film
After Cutting: Workmanship Checks
- Edge quality: Cut edges should be clean without chipping. Minor chips under 0.5mm are acceptable; larger chips indicate wrong blade or technique.
- Surface protection: Keep protective film on until final installation. Any exposed areas risk scratching during handling.
- Panel flatness: Laminated panels should lay completely flat. Warping indicates uneven adhesive application or moisture imbalance between faces.
After Installation: Verification Points
- Edge band adhesion: Run fingernail along edge bands. Properly bonded bands shouldn't lift or feel loose.
- Door alignment: All doors should close evenly without rubbing. Misalignment causes edge wear over time.
- Reflection uniformity: Check surfaces under various lighting. Uneven reflections indicate substrate flatness issues.
- Gap inspection: No visible gaps between laminate and edge bands. Even small gaps allow moisture entry.
Persona-Specific Guidance
For Homeowners: Durability and Cleaning Guide
Daily Care:
- Wipe with dry microfiber cloth for dust removal
- For smudges, use slightly damp cloth followed by dry wipe
- Clean spills immediately—don't let liquids sit on surface
- Avoid placing hot items directly on glossy surfaces (use coasters/trivets)
Weekly Maintenance:
- Clean with mild soap solution (few drops in water)
- Use soft cloth in circular motions
- Dry completely after cleaning—no water spots
- Check edge bands for any lifting or damage
What to Avoid:
- Abrasive cleaners, scrubbing powders, or steel wool
- Harsh chemicals (bleach, ammonia, acetone)
- Excessive water that can seep into edges
- Dragging rough objects across surfaces
For Carpenters and Fabricators: Technical Tips
Cutting Protocol:
- Score decorative face with knife before power saw cuts
- Use 60-80 tooth carbide blades specifically rated for laminate
- Feed rate moderate—too fast causes chipping, too slow causes burning
- Support sheet fully to prevent vibration
Edge Preparation:
- Sand cut edges lightly with 180-grit before edge banding
- Remove all dust before adhesive application
- Pre-heat edge tape for better adhesion in cold weather
- Trim excess tape flush using sharp trimmer, not file
Hinge and Fastening Zones:
- Pre-drill all screw holes to prevent laminate cracking
- Use cup hinges with appropriate mounting plates
- Avoid screws too close to laminate edges (minimum 15mm)
- Apply wax to screws for easier driving without surface pressure cracks
For Architects and Designers: Specification Notes
Specifying Glossy Laminates:
- Mention specific finish level (standard gloss/HD gloss/super gloss/anti-fingerprint)
- Specify thickness based on application (0.8mm general, 1.0mm high-wear)
- Define acceptable batch variation tolerance for colour matching
- Include edge treatment specifications (laser edge/PVC 2mm/matching laminate edge)
Wet Zone Precautions:
- Maintain minimum 100mm clearance from direct water sources
- Specify silicone sealant at all wall-to-cabinet junctions
- Require moisture-resistant substrate in humid spaces
- Include ventilation provisions in enclosed cabinets
Detailing Considerations:
- Avoid glossy laminate on surfaces that will reflect unwanted views
- Consider lighting angles—glossy surfaces create glare
- Specify reveal joints or shadow gaps rather than tight butt joints for long runs
For OEM and Modular Kitchen Manufacturers: Quality Control
Incoming Material QC:
- Sample check 5% of sheets from each delivery for surface defects
- Verify batch numbers match across order
- Measure thickness at multiple points (variation within 0.05mm acceptable)
- Conduct peel adhesion test on edge samples
Process QC Checkpoints:
- Post-cutting: inspect edges for chipping (reject above 1mm)
- Post-lamination: check for bubbles and adhesive bleed-through
- Post-edge banding: verify adhesion and colour match
- Pre-dispatch: surface inspection under controlled lighting
Reducing Returns and Complaints:
- Include care instructions with every delivery
- Use protective packaging for transport
- Document condition at dispatch with photographs
- Train installation teams on handling glossy surfaces
FAQs
Is glossy laminate good for Indian kitchens?
Glossy laminate works well for Indian kitchens with certain precautions. It's suitable for upper cabinets, tall units, and island facades away from direct heat and water sources. However, areas near cooktops, sinks, and heavy-use zones benefit from anti-fingerprint variants or alternative finishes like matte or textured laminates. The key success factor is proper edge sealing and using moisture-resistant substrates like BWR plywood or HDF in humid kitchen environments. Kitchen installations should maintain at least 450mm clearance between glossy surfaces and gas burners to prevent heat damage and yellowing over time.
How do you remove scratches from glossy laminate?
Minor surface scratches on glossy laminate can sometimes be reduced using specialized laminate polish or automotive rubbing compound applied with soft cloth in circular motions. However, deep scratches that penetrate the decorative layer cannot be repaired and are permanent. Prevention is crucial—always use microfiber cloths for cleaning, remove dust before wiping, and avoid contact with abrasive materials. For furniture with accumulated scratches affecting appearance, the only solution is panel replacement. Some anti-fingerprint glossy variants have slightly better scratch recovery properties but still cannot repair deep damage.
What is the difference between HD gloss and normal glossy laminate?
HD (high-definition) gloss laminates use advanced manufacturing technology to achieve superior surface clarity, deeper reflections, and more uniform gloss levels compared to standard glossy laminates. The reflective quality approaches mirror-like finish, making them ideal for premium furniture and feature applications where visual impact is prioritized. HD gloss typically costs 30-50% more than standard gloss versions. Both offer similar durability and maintenance requirements, but HD gloss reveals substrate imperfections more clearly, demanding flatter surfaces and more precise fabrication. Standard gloss is adequate for most residential applications while HD gloss suits showcase furniture and commercial displays.
Can glossy laminate be used in bathrooms?
Glossy laminate is generally not recommended for bathroom applications due to direct water contact, high humidity, and condensation exposure. While the laminate surface itself resists moisture, edges and substrates absorb water readily, causing swelling, warping, and delamination. If glossy aesthetics are essential for bathroom vanities, use marine-grade plywood as substrate, apply comprehensive silicone sealing at all edges and joints, ensure proper ventilation, and accept that maintenance requirements will be higher than dry-zone applications. Better alternatives for bathrooms include solid PVC boards, compact laminate with sealed edges, or painted surfaces with waterproof finishes.
How long does glossy laminate last?
Glossy laminate durability depends heavily on application, usage intensity, and maintenance practices. In low-wear applications like wall panels and bedroom wardrobes, quality glossy laminates maintain appearance for 15-20 years with proper care. Kitchen cabinet doors typically show wear signs after 8-12 years due to grease exposure, cleaning frequency, and handle zone wear. Factors reducing lifespan include direct sunlight exposure (causes fading), abrasive cleaning (creates scratches), moisture exposure (causes edge damage), and heat proximity (causes yellowing). Regular maintenance, avoiding abrasive cleaners, and prompt edge damage repair significantly extend functional life.
Is glossy laminate more expensive than matte laminate?
Glossy and matte laminates from the same manufacturer and product line typically have similar base pricing. However, premium glossy variants like HD gloss, super gloss, and anti-fingerprint finishes cost 20-60% more than standard matte options. The total project cost difference also includes hidden factors—glossy surfaces require more careful handling (potential wastage), more precise fabrication (labour cost), and colour-matched edge banding (material cost). Matte finishes are more forgiving during fabrication and installation. When comparing overall value, consider that matte finishes better hide minor imperfections and require less frequent cleaning, potentially reducing long-term maintenance costs.
Why is my glossy laminate turning yellow?
Yellowing in glossy laminates typically results from heat exposure, UV light degradation, or chemical reactions. Surfaces near cooktops, ovens, or heat-generating appliances commonly yellow due to thermal damage. Prolonged sunlight exposure breaks down surface pigments, especially in lighter colours. Certain cleaning chemicals—particularly bleach-based or ammonia-containing products—can cause chemical yellowing. Prevention involves maintaining distance from heat sources, using UV-filtering window treatments, and cleaning only with mild soap solutions. Once yellowing occurs, it cannot be reversed through cleaning; the affected panels require replacement. Choosing laminates with UV-resistant properties helps prevent sun-related discoloration.
What substrate is best under glossy laminate?
Substrate selection significantly impacts glossy laminate performance. For dry-zone furniture like wardrobes and living room units, commercial-grade plywood (minimum 710 density) or high-density MDF works well. Humid environments require BWR (boiling water resistant) grade plywood or moisture-resistant MDF (often called HMR or green MDF). The substrate surface must be perfectly flat—glossy finishes reveal every undulation. Sand surfaces to 150-180 grit before lamination. Particle board is economical but unsuitable for humidity-prone areas or heavy-use furniture. HDF provides excellent flatness for premium applications. Always match substrate quality to laminate quality; premium HD gloss laminate deserves premium substrate support.
Can glossy laminate be CNC routed for designs?
Glossy laminate can be successfully CNC routed with proper parameters and tooling. Use single-flute spiral upcut bits for clean edge finish. Reduce feed rates by 20-30% compared to MDF routing to prevent chipping. Secure the panel firmly to prevent vibration. The laminate surface should face up during routing to ensure clean decorative face edges. Complex profile routing works better on pre-laminated panels than post-lamination routing. For intricate designs, compact laminates (thicker, self-supporting grades) provide better results than thin HPL bonded to substrates. Always run test cuts on sample material before production routing to optimise parameters for specific laminate thickness and design complexity.
How do I choose between glossy laminate and acrylic finish?
The choice depends on budget, desired gloss level, and project scale. Glossy laminates cost significantly less (₹70-150/sq ft vs ₹200-350/sq ft for acrylic), making them suitable for larger surfaces and budget-conscious projects. Acrylic provides deeper gloss, better scratch recovery, and superior depth perception but requires factory application and is difficult to repair on-site. Laminates offer easier site repairs and replacement. For kitchen shutters and wardrobes in typical Indian homes, quality glossy laminates deliver excellent value. Acrylic suits premium kitchens where budget allows and maximum visual impact is required. Consider anti-fingerprint glossy laminate as a middle-ground option combining reasonable cost with enhanced surface properties.
Do glossy laminates show dust and fingerprints easily?
Yes, standard glossy laminates prominently display fingerprints, dust, and smudges, particularly in darker colours. The reflective surface that creates visual appeal also highlights surface contamination. This characteristic requires more frequent cleaning to maintain appearance. Anti-fingerprint (AFP) variants significantly reduce this issue through special surface treatments that prevent oil transfer and smudge visibility. Light colours (white, cream, light grey) show fingerprints less than dark colours (black, navy, dark brown). For high-touch surfaces like kitchen doors and wardrobe handles, consider AFP variants, lighter colours, or alternative matte/textured finishes if frequent cleaning isn't practical for your household.
What edge banding works best with glossy laminate?
Colour-matched PVC edge banding in 1-2mm thickness provides durable, water-resistant edge protection for glossy laminate panels. Laser edge banding creates seamless, virtually invisible joints by melting adhesive into a thin line—ideal for premium applications. ABS edge bands offer similar performance with better environmental credentials. Matching laminate strips can create edge bands for visible surfaces requiring exact colour match. Melamine edge bands are economical but less durable for frequently handled edges. Key success factors include exact colour matching (order edge bands with laminate sheets from same supplier), proper adhesive application, and clean trimming without scratching the laminate surface during finishing.
Disclaimer: This content is provided for general informational purposes based on industry practices and publicly available information. Product specifications, standards, prices, and availability may vary by manufacturer, region, and time. Readers should independently verify details with manufacturers, dealers, or qualified professionals before making purchase or construction decisions.
Want Plywood Suggestions?
Share a few details and a VIR MDF specialist will suggest suitable brands and connect you to responsive dealers.