MDF Laser Cutting: Guide for CNC & Design Projects
MDF laser cutting guide: best thickness, machine settings & design tips. Learn why VIR MDF is preferred for CNC and laser cutting projects.
Quick Decision Summary
Quick Answer: MDF laser cutting delivers precise, clean cuts ideal for CNC design projects, signage, furniture components, and decorative panels. For best results in Indian conditions, use 3mm to 12mm standard MDF with a CO2 laser at 40-80W power, ensuring proper air assist and extraction for optimal edge quality.
If you're in a hurry: MDF outperforms plywood and solid wood for laser cutting due to its uniform density and absence of grain direction. A 50W CO2 laser typically cuts 6mm MDF cleanly at 10-12mm/s speed. Always use low-formaldehyde MDF grades, ensure adequate ventilation, and apply masking tape to prevent surface staining from smoke residue.
Choose MDF laser cutting if:
- You need intricate patterns, letters, or detailed designs
- Your project requires consistent, repeatable cuts across multiple pieces
- You want clean edges without splintering or grain interference
- Budget constraints make solid wood or acrylic impractical
Avoid MDF laser cutting if:
- The finished product will face direct moisture exposure
- Structural load-bearing strength is critical
- You lack proper ventilation or extraction systems
- The design requires thickness exceeding 18mm in single-pass cutting
What MDF Laser Cutting Actually Means
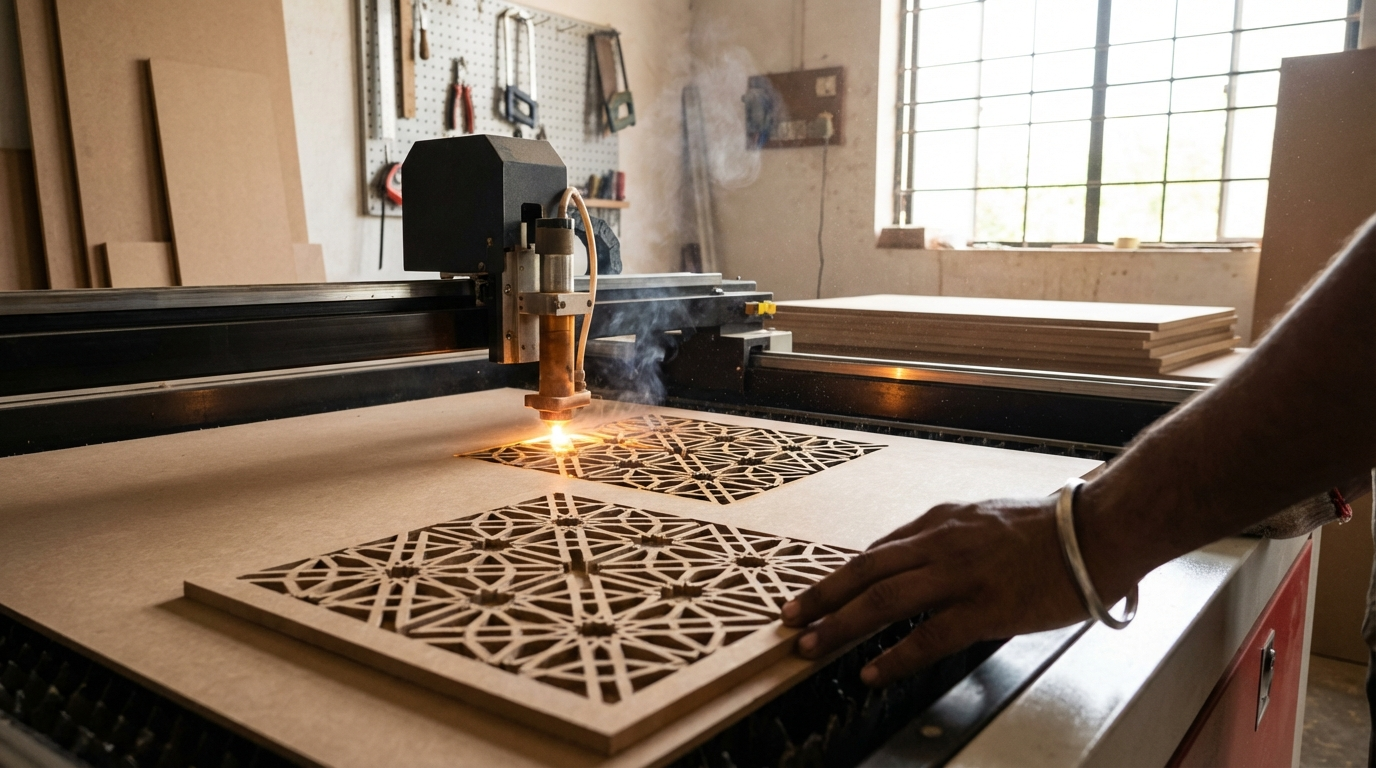
MDF laser cutting refers to the process of using a focused laser beam—typically CO2 laser technology—to cut or engrave Medium Density Fiberboard with high precision. The laser vaporises the wood fibres along a programmed path, creating cuts as narrow as 0.1mm with smooth, char-free edges when settings are optimised correctly.
Within the material hierarchy for laser processing, MDF sits between plywood (inconsistent density, prone to voids) and acrylic (expensive, requires different settings). MDF's engineered composition—wood fibres bonded with resin under heat and pressure—creates uniform density throughout the sheet, making laser behaviour predictable and repeatable.
Common Confusions Clarified
- MDF vs HDF for laser cutting: HDF (High-Density Fiberboard) cuts slightly slower but produces even cleaner edges due to tighter fibre bonding
- Laser cutting vs CNC routing: Laser cutting uses heat (no physical contact), while CNC routing uses rotating bits; lasers excel at fine details, CNC handles thicker materials
- CO2 vs Diode lasers: CO2 lasers (40-100W) cut MDF efficiently; diode lasers (10-20W) work for thin MDF but require multiple passes
Why MDF Laser Cutting Matters for Indian Design Projects
India's climate presents unique challenges for laser-cut MDF projects. Understanding these factors prevents costly failures and ensures longevity of finished products.
Monsoon and Humidity Impact
During June-September monsoon season, ambient humidity in coastal cities like Mumbai or Chennai can exceed 85%. Laser-cut MDF edges—being more porous than factory-sealed surfaces—absorb moisture rapidly. This causes edge swelling within 48-72 hours if left untreated. Projects completed during monsoon require immediate edge sealing with PU sealer or melamine edge banding.
Coastal Environment Considerations
Salt-laden air in coastal regions accelerates MDF degradation. For projects in Gujarat, Maharashtra, Kerala, or Tamil Nadu coastal areas, standard MDF laser cuts require additional protective finishing. Consider MR-MDF (Moisture Resistant) for coastal applications, though it requires 15-20% higher laser power for clean cuts.
Workshop Realities
Indian workshops often store MDF sheets in semi-open areas during construction phases. Dust accumulation on MDF surfaces before laser cutting causes inconsistent results—the dust burns before the MDF, creating surface marks. Always wipe sheets with a clean cloth before processing, and store sheets flat on pallets away from direct sunlight and moisture sources.
MDF Thickness Guide for Laser Cutting
Selecting the correct MDF thickness determines cut quality, processing time, and structural integrity of your finished project. Here's a comprehensive breakdown for common Indian market thicknesses:
| MDF Thickness | Recommended Laser Power | Typical Cut Speed | Best Applications | Single-Pass Capability |
|---|---|---|---|---|
| 3mm (1/8") | 40-50W CO2 | 15-25mm/s | Coasters, ornaments, stencils, letters | Yes, clean cut |
| 6mm (1/4") | 50-60W CO2 | 10-15mm/s | Signs, decorative panels, jigsaw puzzles | Yes, with proper focus |
| 9mm | 60-80W CO2 | 6-10mm/s | Furniture components, display stands | Yes, may need slower speed |
| 12mm (1/2") | 80-100W CO2 | 4-8mm/s | Cabinet parts, structural elements | Possible with high power |
| 18mm (3/4") | 100W+ CO2 | 2-4mm/s | Heavy-duty components | Often requires multiple passes |
Indian market note: Standard sheet size is 8x4 feet (2440mm x 1220mm). Most job-work laser cutting services in Delhi, Mumbai, Bangalore, and Chennai stock 3mm, 6mm, and 12mm thicknesses. Special orders may be needed for 9mm and 18mm.
Laser Cutting Machine Settings for MDF
Achieving clean, burn-free laser cuts on MDF requires balancing power, speed, focal length, and air assist. These settings vary based on your specific machine, but the principles remain consistent.
Power and Speed Relationship
The fundamental rule: higher power allows faster speeds; lower speeds at moderate power increase heat affected zone (HAZ) and charring risk. For presentation-quality cuts with minimal edge darkening, use maximum safe power at optimised speed rather than reducing power and slowing down.
Recommended Starting Parameters
| MDF Thickness | Power Setting | Speed (mm/s) | Passes | Air Assist |
|---|---|---|---|---|
| 3mm Standard MDF | 50-60% of 80W | 18-22 | 1 | High |
| 6mm Standard MDF | 70-80% of 80W | 10-14 | 1 | High |
| 3mm MR-MDF | 60-70% of 80W | 15-20 | 1 | High |
| 6mm MR-MDF | 80-90% of 80W | 8-12 | 1 | High |
Critical note: Always run test cuts on scrap material before final production. MDF batches vary in density and resin content, affecting cutting behaviour even with identical settings.
Focal Length Selection
- 2" (50.8mm) lens: Best for MDF up to 6mm—produces narrow kerf, high precision
- 2.5" (63.5mm) lens: Ideal for 6-12mm MDF—better depth penetration, slightly wider kerf
- 4" (101.6mm) lens: Use for thick MDF (12mm+) or when cut edge perpendicularity matters
Air Assist: Why It's Non-Negotiable
Air assist serves four critical functions in MDF laser cutting:
- Blows smoke and debris away from the cut zone, preventing laser beam dispersion
- Protects the focusing lens from resin deposits and contamination
- Cools the cutting area, reducing heat affected zone and charring
- Extinguishes small flames that can occur during cutting
A standard aquarium pump (4-5 LPM) provides sufficient air assist for most MDF cutting. Industrial applications may use compressed air at 0.5-1 bar pressure.
Step-by-Step MDF Laser Cutting Process
Step 1: Material Preparation
Clean the MDF surface with a dry microfibre cloth. Apply masking tape or transfer paper if you need a pristine surface finish. Ensure the sheet lies perfectly flat on the laser bed—any warping causes inconsistent focal distance and incomplete cuts.
Step 2: Design File Preparation
Prepare your design in vector format (SVG, DXF, or AI). For cutting, use hairline strokes (0.001mm width) in a single colour. For engraving, create separate layers. Ensure all paths are closed for complete cuts. Check for duplicate lines—double-cutting weakens edges and causes excessive charring.
Step 3: Machine Setup
Power on the laser cutter and extraction system. Clean the lens and mirrors if needed. Set the focal height using the machine's focus tool or manual measurement. Position the MDF sheet and secure if necessary (magnets work well for thin MDF).
Step 4: Test Cut
Run a small test cut (25mm square) on scrap material from the same batch. Check that the piece falls free cleanly. If it doesn't, reduce speed by 2mm/s and retest. Examine edge quality—minimal darkening with no white ash indicates optimal settings.
Step 5: Production Run
Upload the final design, verify positioning using the preview function, and execute the cut. Monitor the first few seconds for any issues. Never leave a laser cutter unattended during operation.
Step 6: Post-Processing
Allow cut pieces to cool before handling. Remove masking tape carefully. Sand edges lightly with 220-grit sandpaper if needed. Apply sealer, primer, or paint as required for your application.
Decision Framework: Which MDF Grade for Which Application
| Application Condition | Recommended MDF Grade | What to Verify |
|---|---|---|
| Interior decorative panels (AC rooms) | Standard MDF, Plain or Pre-laminated | Smooth surface, no visible defects |
| Kitchen cabinet components | MR-MDF (Moisture Resistant) | Green core colour, water drop test on edge |
| Bathroom vanity fronts | BWR-MDF or HDHMR | Boiling water test certification |
| Coastal area installations | MR-MDF minimum, BWR preferred | Edge sealing mandatory post-cutting |
| High-humidity storage (monsoon) | MR-MDF with PU sealing | Store flat, seal within 24 hours of cutting |
| Fire-prone areas (near kitchen hob) | FR-MDF (Fire Retardant) | ISI certification, flame test documentation |
| Intricate CNC patterns/screens | Standard MDF 6-9mm | Uniform density, no soft spots |
| Commercial signage (outdoor covered) | MR-MDF with exterior finish | UV-resistant topcoat required |
Common Buyer Mistakes (And How to Avoid Them)
Mistake 1: Using plywood settings for MDF
Consequence: Excessive charring, incomplete cuts, wasted material
Prevention: MDF typically requires 10-15% higher speed than equivalent thickness plywood due to its denser, more uniform structure
Mistake 2: Ignoring formaldehyde grades
Consequence: Toxic fume exposure, health hazards, workshop contamination
Prevention: Source E0 or E1 grade MDF specifically labelled for laser cutting; ensure extraction leads outside the building
Mistake 3: Skipping test cuts on new batches
Consequence: Ruined production pieces, inconsistent quality
Prevention: Every new MDF batch requires fresh test cuts—density varies between manufacturers and batches
Mistake 4: Cutting without masking
Consequence: Smoke staining on surface, difficult-to-remove residue
Prevention: Apply low-tack masking tape or transfer paper before cutting; peel immediately after
Mistake 5: Insufficient extraction setup
Consequence: Smoke accumulation, lens contamination, surface staining, fire hazard
Prevention: Extraction should visibly pull smoke away from the cut zone; upgrade if smoke lingers
Mistake 6: Storing laser-cut pieces without sealing
Consequence: Edge swelling during monsoon, warping, delamination over weeks
Prevention: Seal cut edges within 24-48 hours, especially during June-September in humid regions
Mistake 7: Using damaged or warped MDF sheets
Consequence: Inconsistent focal distance, partial cuts, broken pieces
Prevention: Inspect sheets before purchase; reject any with visible bowing, edge damage, or soft spots
Mistake 8: Attempting single-pass cuts on thick MDF with underpowered lasers
Consequence: Charred edges, incomplete cuts, material waste
Prevention: Match laser power to material thickness; use multiple passes at higher speed for thick MDF on lower-powered machines
Failure Modes and How to Prevent Them
Failure Mode 1: Excessive Edge Charring
Symptom: Black, brittle edges that crumble when touched
Root Cause: Too much power, too slow speed, or inadequate air assist
Prevention: Increase speed, ensure air assist is functioning, clean nozzle
Fix if already happening: Light sanding with 180-grit removes char; seal with primer before painting
Failure Mode 2: Incomplete Cuts (Material Not Falling Free)
Symptom: Pieces remain attached at bottom, requiring manual breaking
Root Cause: Insufficient power, incorrect focal height, dirty lens, or MDF thicker than specified
Prevention: Verify focal distance, clean optics, confirm material thickness
Fix if already happening: Run second pass at 50% speed; use craft knife to separate gently
Failure Mode 3: Surface Staining from Smoke
Symptom: Yellow-brown residue on MDF surface around cut areas
Root Cause: Poor extraction, insufficient air assist, masking not applied
Prevention: Upgrade extraction, apply masking tape, increase air assist pressure
Fix if already happening: Wipe with isopropyl alcohol; stubborn stains require light sanding
Failure Mode 4: Edge Swelling Post-Cutting
Symptom: Cut edges expand, become rough, or separate into fibres
Root Cause: Moisture absorption through unsealed edges, especially in humid conditions
Prevention: Seal edges within 24 hours using PU sealer, edge banding, or paint
Fix if already happening: Sand swollen area, apply wood hardener, then seal; severe cases require recutting
Failure Mode 5: Warping After Cutting
Symptom: Flat sheet develops curves or bows after laser processing
Root Cause: Heat stress release, uneven moisture content, one-sided cutting of large sheets
Prevention: Allow cut pieces to cool flat under weight; balance cuts across sheet
Fix if already happening: Place warped piece between flat boards with weight for 24-48 hours
Failure Mode 6: Fire During Cutting
Symptom: Active flames in cut zone
Root Cause: Air assist failure, excessive power, resin-heavy MDF batch, accumulated debris
Prevention: Verify air assist before every job, clean bed regularly, never leave machine unattended
Fix if already happening: Pause job immediately, extinguish with CO2 extinguisher (not water), inspect for damage before resuming
Quality Checks Without Lab Tests
Before Buying MDF for Laser Cutting
- Visual inspection: Surface should be uniformly smooth, no visible fibre clumps or voids
- Edge examination: Factory edge should be dense and consistent, not crumbly
- Flex test: Sheet should resist bending; excessive flexibility indicates low density
- Weight comparison: Heavier sheets of same size indicate higher density (better for cutting)
- Smell test: Strong chemical odour suggests high formaldehyde content—avoid for laser work
Questions to ask supplier:
- What is the formaldehyde emission class (E0, E1, E2)?
- Is this batch suitable for laser cutting?
- What is the actual density (should be 680-800 kg/m³ for standard MDF)?
- How was the material stored? (Reject if stored outdoors or in damp conditions)
After Cutting: Quality Verification
- Edge colour: Light tan to medium brown indicates good cut; black/charred suggests settings need adjustment
- Edge feel: Should be smooth, not rough or crumbly
- Dimensional accuracy: Measure critical dimensions against design—kerf allowance typically 0.15-0.25mm
- Corner quality: Sharp internal corners should be crisp; rounded corners indicate focus issues
After Installation: Ongoing Assessment
- Check edges monthly during first monsoon season for swelling
- Verify paint/finish adhesion hasn't bubbled or peeled
- Confirm joints remain tight (loose joints suggest moisture cycling)
Tips by User Type
For Homeowners
When ordering laser-cut MDF decorative panels, signs, or furniture components from fabricators:
- Request to see sample cuts before committing to large orders
- Specify whether pieces will be used in AC or non-AC rooms—this affects MDF grade selection
- Ask about edge finishing options: raw edges absorb dust and moisture
- Budget for finishing costs (primer, paint, sealer) which can add 30-40% to material cost
- For intricate jali/screen patterns, 6mm MDF provides good balance of detail and durability
For Carpenters and Fabricators
Practical workshop tips for laser-cutting MDF:
- Cutting direction: For large sheets, cut from centre outward to minimise heat buildup
- Nesting efficiency: Leave minimum 3mm between parts for clean separation
- Screw zones: Pre-drill pilot holes in laser-cut pieces—MDF splits easily when screwed near edges
- Hinge areas: Reinforce laser-cut hinge mounting areas with hardwood inserts or metal backing plates
- Handling: Wear cotton gloves when handling freshly cut MDF—oils from hands cause finishing issues
- Storage: Stack cut pieces flat with MDF spacers between; standing upright causes warping
For Architects and Designers
Specification considerations for laser-cut MDF in projects:
- Drawing callouts: Specify "MDF, E1 grade minimum, suitable for laser cutting, thickness ±0.3mm tolerance"
- Wet zone details: MR-MDF mandatory within 600mm of water sources; specify edge sealing method
- Finish schedules: Include primer coat specification—MDF requires specific primers for adhesion
- Pattern tolerances: Inform clients that laser kerf removes 0.15-0.25mm; adjust designs for tight-fit assemblies
- Installation notes: Specify that cut edges face away from high-humidity exposure zones
For Modular Kitchen and OEM Manufacturers
Quality control and production optimisation:
- Batch testing: Run test cuts from every new MDF batch; log settings for consistency
- Incoming inspection: Measure actual thickness at multiple points—variations affect cut quality
- Complaint reduction: 70% of customer complaints relate to edge finishing; seal all exposed edges before dispatch
- Machine maintenance: Clean laser lens daily during production; contamination reduces cutting efficiency by 20-30%
- Documentation: Photograph and record settings for repeat orders; MDF properties vary seasonally
MDF Laser Cutting Applications and Design Ideas
Home Decor Applications
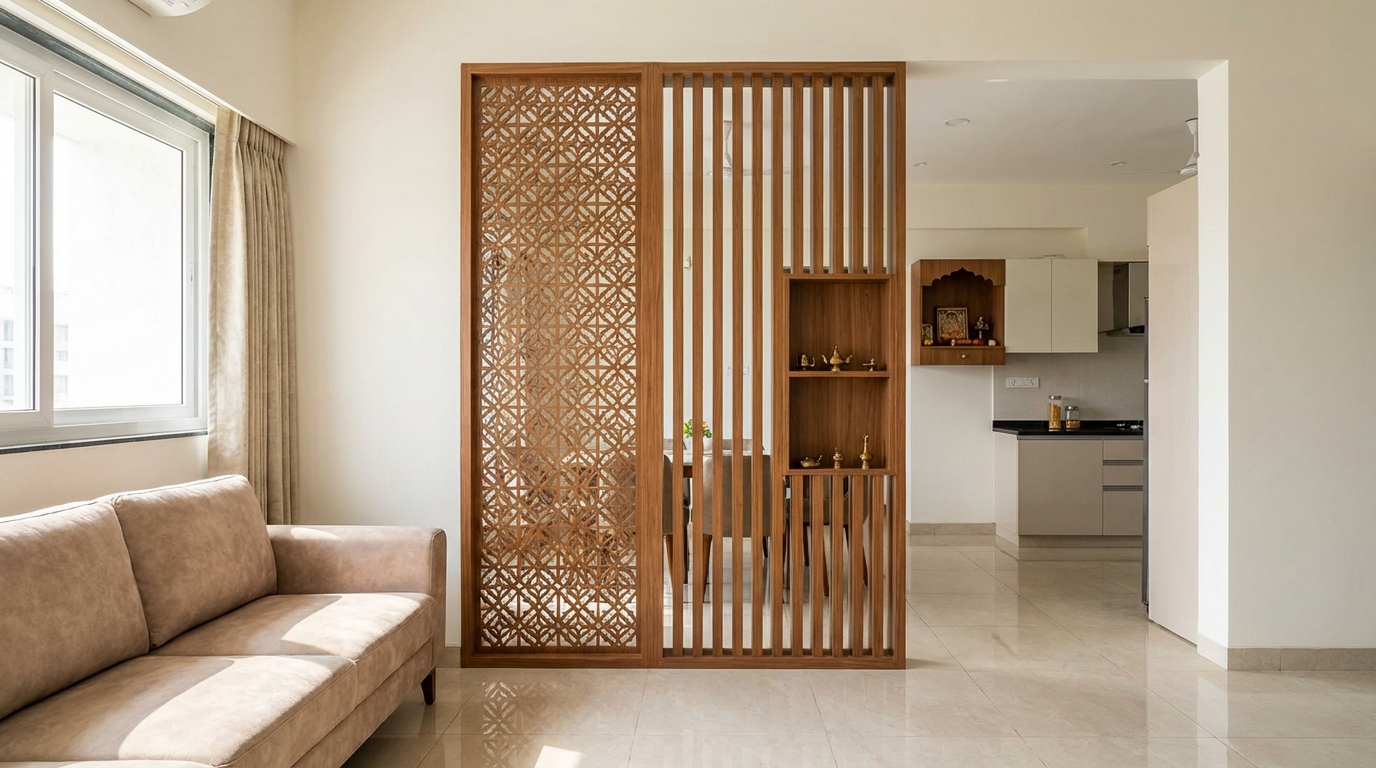
- Decorative wall panels with geometric or traditional Indian patterns
- Room divider screens (jali) in 6-9mm MDF
- Custom nameplates and house numbers
- Photo frames with intricate border designs
- Festival decorations (Diwali diyas, Ganesh motifs, Eid crescents)
- Clock faces with elaborate cutout patterns
Furniture Components
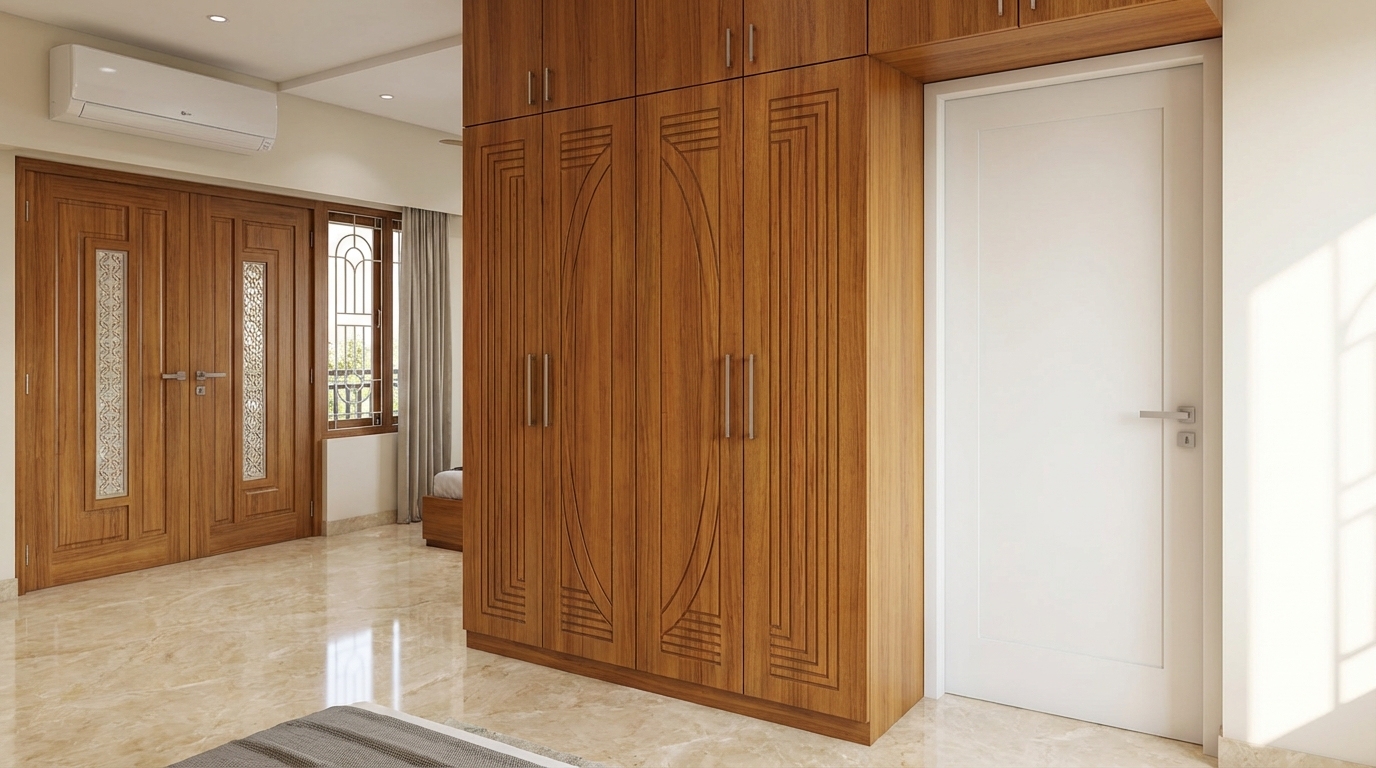
- Wardrobe door panels with pattern inserts
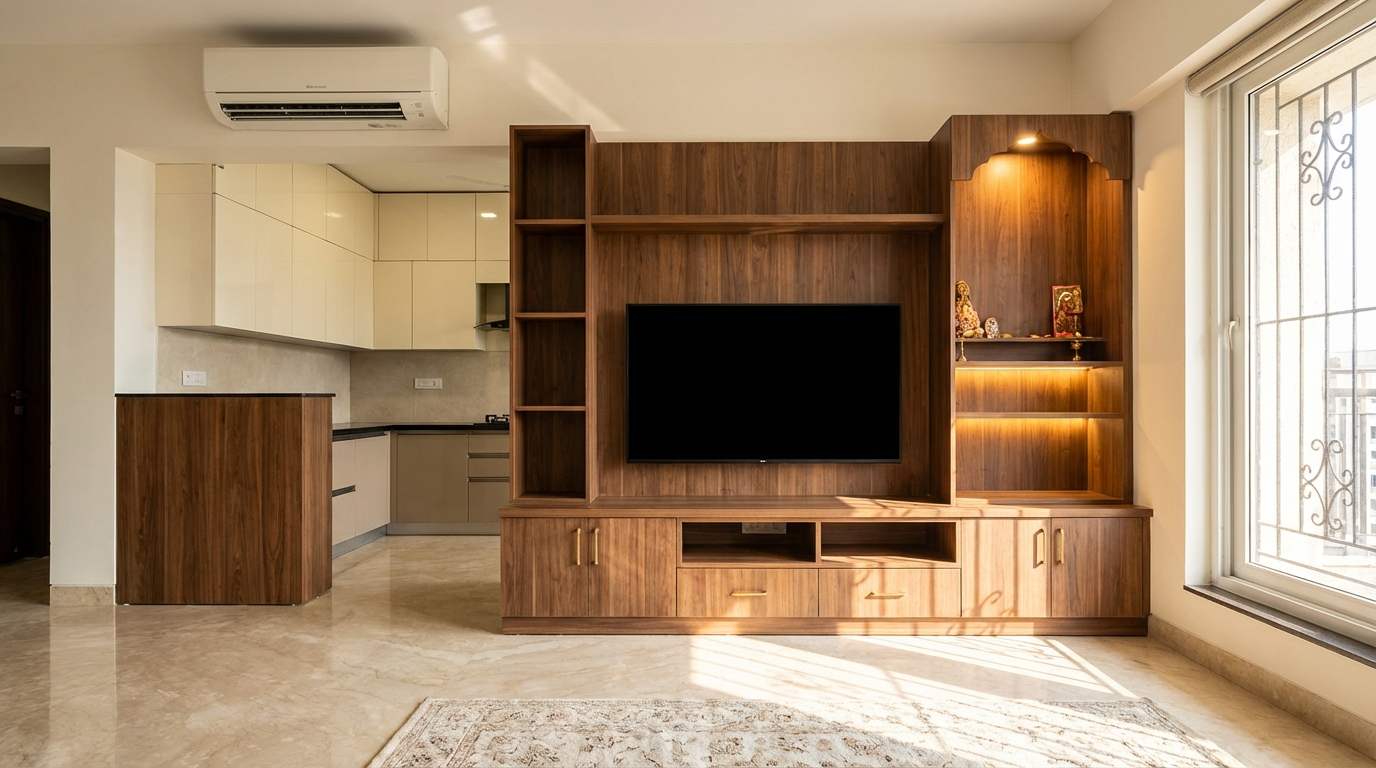
- TV unit back panels with ventilation patterns
- Bed headboard decorative sections
- Shoe rack organisers with custom compartments
- Study table organisers and pen holders
- Modular shelving components
Commercial and Retail
- Point-of-sale displays and product stands
- Reception desk front panels
- Menu boards for restaurants and cafes
- Retail signage and wayfinding elements
- Exhibition booth components
- Corporate logo displays and dimensional letters
Educational and Hobby
- Architectural scale models
- 3D puzzle assemblies
- Educational teaching aids
- Dollhouses and miniatures
- Board game components
- Prototype models for product development
MDF vs Alternatives for Laser Cutting
| Parameter | MDF | Plywood | Acrylic | Solid Wood |
|---|---|---|---|---|
| Cut consistency | Excellent—uniform density | Variable—voids cause issues | Excellent—predictable | Variable—grain affects cut |
| Cost per sq ft (6mm) | ₹15-25 | ₹30-50 | ₹80-150 | ₹100-300+ |
| Detail capability | High—intricate patterns possible | Medium—risk of splintering | Very high—crisp edges | Medium—grain interferes |
| Moisture resistance | Poor (standard), Good (MR grade) | Better than standard MDF | Excellent | Variable by species |
| Finishing ease | Excellent—paints well | Good—shows grain | Not required—polished | Good—stains/oils |
| Structural strength | Moderate | Good | Moderate (brittle) | Excellent |
| Fume toxicity | Moderate (formaldehyde) | Moderate (glue fumes) | Low (proper acrylic) | Low (natural) |
Choose MDF when: Budget is constrained, intricate details are required, pieces will be painted, and moisture exposure is controlled.
Choose plywood when: Structural strength matters, natural wood appearance is desired, or pieces will face moderate moisture.
Choose acrylic when: Colour variety, transparency, or premium appearance is required, and budget allows.
Frequently Asked Questions
Can standard MDF be laser cut safely in home workshops?
Yes, standard MDF can be laser cut in home workshops with proper precautions. The critical requirement is adequate ventilation and fume extraction—MDF releases formaldehyde and fine particulates during cutting. Use low-formaldehyde (E1 or E0 grade) MDF, ensure your extraction system vents outside the building, wear a respirator during and immediately after cutting, and never leave the laser unattended. Small hobby lasers (20-50W) handle 3-6mm MDF effectively for craft projects.
What laser power is needed to cut different MDF thicknesses?
As a general guideline, a 40W CO2 laser cuts 3mm MDF cleanly in single pass at around 15-20mm/s. For 6mm MDF, 50-60W is recommended at 10-15mm/s. Thicker 12mm MDF requires 80-100W at 4-8mm/s for clean single-pass cutting. Diode lasers (10-20W) can cut thin MDF (up to 3mm) but require multiple passes and produce more charring. These are starting points—always run test cuts as MDF density varies between manufacturers.
How do I prevent MDF from charring during laser cutting?
Preventing charring requires balancing three factors: use maximum safe power at higher speeds rather than low power at slow speeds; ensure strong air assist is blowing directly into the cut zone; and verify your extraction system removes smoke immediately. Additionally, apply masking tape to the surface, use fresh MDF (stored material absorbs moisture, increasing char), and clean your lens before each session. If charring persists, your focal length may be incorrect—recheck the focus distance.
Is MR-MDF or standard MDF better for laser cutting decorative panels?
For purely decorative indoor panels in air-conditioned spaces, standard MDF performs excellently and costs less. MR-MDF is necessary when panels will be installed in kitchens, bathrooms, or non-AC rooms in humid climates. MR-MDF requires approximately 15-20% more laser power for equivalent cuts due to its moisture-resistant resin content. For monsoon-prone regions or coastal installations, MR-MDF with proper edge sealing is the safer choice despite higher processing requirements.
What file formats work best for MDF laser cutting designs?
Vector formats are essential for clean laser cuts. SVG (Scalable Vector Graphics) works with most laser software and preserves scalability. DXF (Drawing Exchange Format) is industry-standard for CNC and laser work. AI (Adobe Illustrator) files work if your software supports them. Avoid raster formats (JPG, PNG) for cutting—they work only for engraving. Ensure all paths are closed, remove duplicate lines, and set stroke width to hairline (0.001mm) for cutting operations.
How much does MDF laser cutting cost in India per square foot?
Job-work MDF laser cutting in India typically ranges from ₹25-80 per square foot, depending on design complexity, material thickness, and location. Simple geometric cuts in 3mm MDF cost ₹25-35/sq ft; intricate patterns with many cuts cost ₹50-80/sq ft. Material cost is additional—budget ₹15-30/sq ft for the MDF itself depending on grade. Bulk orders often receive 15-25% discounts. Prices in metro cities like Delhi, Mumbai, and Bangalore tend to be 10-15% higher than tier-2 cities.
Can pre-laminated MDF be laser cut without damaging the laminate?
Pre-laminated MDF can be laser cut, but requires careful parameter adjustment. The laminate layer (melamine or PVC) has different thermal properties than the MDF core. Use slightly higher power and speed to cut cleanly through the laminate before it has time to melt excessively. Apply masking tape to protect the laminate surface from smoke staining. Light-coloured laminates show edge darkening more than dark colours. Test cuts are essential—laminate formulations vary significantly between brands.
What is the kerf width when laser cutting MDF, and how do I compensate for it?
Kerf width—the material removed by the laser beam—typically ranges from 0.15-0.30mm for MDF with CO2 lasers, depending on laser power and focal length. For precision assemblies with tab-and-slot joints, offset your cut lines inward by half the kerf width (typically 0.1-0.15mm). For decorative pieces where exact dimensions matter less, kerf compensation may be unnecessary. Run test cuts and measure actual kerf with calipers before production runs requiring tight tolerances.
How should laser-cut MDF pieces be stored before installation or finishing?
Store laser-cut MDF pieces flat on a level surface, with MDF spacers between stacked pieces to allow air circulation. Keep them in a cool, dry area away from direct sunlight—UV exposure can cause surface yellowing. During monsoon season, store in air-conditioned spaces or with dehumidifiers if possible. Seal cut edges within 24-48 hours to prevent moisture absorption. If pieces must wait longer before finishing, wrap them in plastic sheeting with silica gel packets to control humidity.
Why does my laser-cut MDF have a rough edge on one side only?
Single-sided roughness typically indicates incorrect focal height or inadequate air assist pressure. The laser beam forms a cone shape—if focus is set for the top surface, the bottom receives a wider, less concentrated beam. Try adjusting focal point to middle of material thickness for thicker MDF. Also check that air assist nozzle isn't blocked on one side, causing uneven smoke clearing. Worn or dirty lens creates similar issues—inspect and clean optics if problem persists across multiple cuts.
Can laser-cut MDF be used for outdoor applications with proper finishing?
MDF is not recommended for outdoor applications, even with finishing. While exterior-grade paints and sealers provide temporary protection, MDF's core composition absorbs moisture through any finish breach—a single scratch or edge exposure leads to swelling and degradation. For outdoor signage or decorative elements, use marine plywood, WPC (Wood Plastic Composite), or exterior-grade PVC boards instead. If MDF must be used outdoors, limit to fully covered areas with no direct rain or moisture exposure, and use MR-MDF with multiple sealer coats.
What safety equipment is essential for MDF laser cutting operations?
Essential safety equipment includes: proper fume extraction system venting outside (not just filtered recirculation); laser safety glasses appropriate for your laser wavelength (typically 10.6μm for CO2); N95 or P100 respirator mask; fire extinguisher (CO2 type) within arm's reach; smoke detector in the workspace. Additionally, ensure first-aid kit is accessible, wear long sleeves and closed-toe shoes, tie back long hair, and never leave the laser operating unattended. Have emergency stop accessible and know your machine's shutdown procedure.
Note: This is independent informational content and is not affiliated with any manufacturer.
Disclaimer: This content is provided for general informational purposes based on industry practices and publicly available information. Product specifications, standards, prices, and availability may vary by manufacturer, region, and time. Readers should independently verify details with manufacturers, dealers, or qualified professionals before making purchase or construction decisions.Want Plywood Suggestions?
Share a few details and a VIR MDF specialist will suggest suitable brands and connect you to responsive dealers.