MDF Moulding & Wall Patti: Designs, Profiles & Installation
MDF moulding designs for walls: profiles, patterns & DIY installation guide. Transform your home with VIR MDF wall moulding solutions.
Quick Decision Summary
Quick Answer: MDF moulding (also called wall patti in India) is an engineered wood trim used to add decorative profiles, frames, and patterns to interior walls. It costs 40-70% less than solid wood moulding while offering superior paint finish and easier customization for Indian homes.
If you're in a hurry: MDF moulding transforms plain walls into elegant feature surfaces through profiles like chair rails, crown moulding, baseboards, and geometric patterns. For Indian conditions, use standard MDF in AC rooms and MR-MDF (moisture resistant) in humid zones. Expect ₹35-120 per running foot depending on profile complexity, with installation adding ₹15-40 per foot for carpenter labour.
Choose MDF moulding if:
- You want paint-grade finishes without visible wood grain
- Budget is a primary concern over natural wood aesthetics
- Your design requires intricate CNC-routed patterns
- Walls need quick transformation without structural changes
Avoid MDF moulding if:
- Installation area faces direct water exposure (bathroom wet zones)
- You prefer natural wood grain visibility
- Location experiences extreme humidity without climate control
- Outdoor or semi-covered areas are the target application
What MDF Moulding and Wall Patti Actually Mean
MDF moulding refers to decorative trim profiles manufactured from Medium Density Fibreboard—an engineered wood panel made by binding wood fibres with resin under heat and pressure. These profiles are machined into various cross-sectional shapes that serve both functional and aesthetic purposes on interior walls.
In Indian construction terminology, "wall patti" (पट्टी meaning strip or band) is the colloquial term for any linear decorative element applied to walls. When made from MDF, wall patti offers consistent dimensions, smooth surfaces ready for painting, and the ability to create complex profiles that would be prohibitively expensive in solid wood.
Where MDF Moulding Fits in the Material Hierarchy
MDF moulding sits between solid hardwood moulding (premium) and PVC/polystyrene moulding (economy) in terms of cost and performance. Unlike solid wood, MDF has no grain direction, making it ideal for profiles that require sharp edges and uniform paint absorption. Unlike PVC, MDF accepts paint beautifully and doesn't have the plastic appearance that cheapens interiors.
Common Confusions Clarified
- MDF vs HDF for moulding: HDF (High Density Fibreboard) is denser and harder, better for high-impact areas like baseboards in commercial spaces
- Moulding vs panelling: Moulding refers to linear profiles; panelling covers larger wall surfaces with flat boards
- Wall patti vs beading: Beading is typically smaller (under 20mm), while patti can be any width of decorative strip
- Pre-primed vs raw MDF: Pre-primed moulding has factory-applied primer, reducing on-site preparation time
Why MDF Moulding Matters for Indian Homes
Indian residential interiors face unique challenges that make material selection critical. MDF moulding addresses several India-specific concerns when chosen and installed correctly.
Monsoon and Humidity Impact
During June-September, relative humidity in many Indian cities exceeds 80%. Standard MDF absorbs moisture and can swell at edges if not properly sealed. This doesn't mean avoiding MDF—it means selecting MR-MDF for humid climates or ensuring all edges are sealed with primer before painting. Coastal cities like Mumbai, Chennai, and Kolkata require extra attention to edge treatment.
Real Consequences of Poor Selection
- Edge swelling: Unsealed MDF edges absorb moisture, causing visible gaps at joints
- Paint bubbling: Inadequate priming leads to moisture trapped under paint film
- Warping: Thin profiles (under 9mm) without wall adhesion can bow outward
- Delamination: In extreme cases, the surface layer separates from core
Site Handling Realities
Indian construction sites often expose materials to dust, moisture, and rough handling before installation. MDF moulding should be stored flat, off the ground, in covered areas. Delivery during monsoon requires waterproof packaging verification. Many complaints stem from pre-installation damage rather than material defects.
Types of MDF Moulding Profiles Explained
MDF moulding comes in standardized profiles, each serving specific design and functional purposes. Understanding these helps specify the right product for your project.
| Profile Type | Typical Size (mm) | Primary Application | Installation Zone |
|---|---|---|---|
| Crown Moulding | 50-150mm width | Ceiling-wall junction | 45° angle at ceiling |
| Chair Rail | 50-75mm width | Horizontal wall division | 900-1000mm from floor |
| Baseboard/Skirting | 75-150mm height | Wall-floor junction | Floor level |
| Picture Rail | 30-50mm width | Art hanging system | 1800-2100mm from floor |
| Panel Moulding | 20-40mm width | Frame patterns on walls | Within wall panels |
| Casing/Architrave | 50-100mm width | Door/window frames | Around openings |
| Dado Rail | 40-60mm width | Lower wall protection | 750-900mm from floor |
| Cove Moulding | 20-50mm concave | Soft corner transitions | Any junction |
Common Misunderstandings About Profile Selection
- Crown moulding doesn't always require 45° cutting—spring angle varies by profile design
- Thicker profiles aren't automatically better—room proportions dictate appropriate scale
- Pre-made corners are available for crown moulding, eliminating complex mitre cuts
- Flexible MDF moulding exists for curved walls but costs 2-3x standard profiles
- Profile depth affects shadow lines—deeper profiles create more dramatic effects
Popular MDF Wall Moulding Design Patterns for 2026
Wall moulding designs range from minimalist modern to elaborate traditional. Here are the trending patterns suitable for Indian interiors in 2026.
Wainscoting and Panel Designs
Classic raised panel: Rectangular frames created with panel moulding, typically covering the lower third of walls (900-1200mm height). Works well in dining rooms and formal living spaces.
Shaker style: Simple rectangular frames using flat-profile moulding. Clean lines suit contemporary Indian apartments where elaborate designs feel overwhelming.
Board and batten: Vertical strips at regular intervals (typically 400-600mm spacing) connected by horizontal rails. Creates height illusion in rooms with standard 9-10 foot ceilings.
Geometric and Modern Patterns
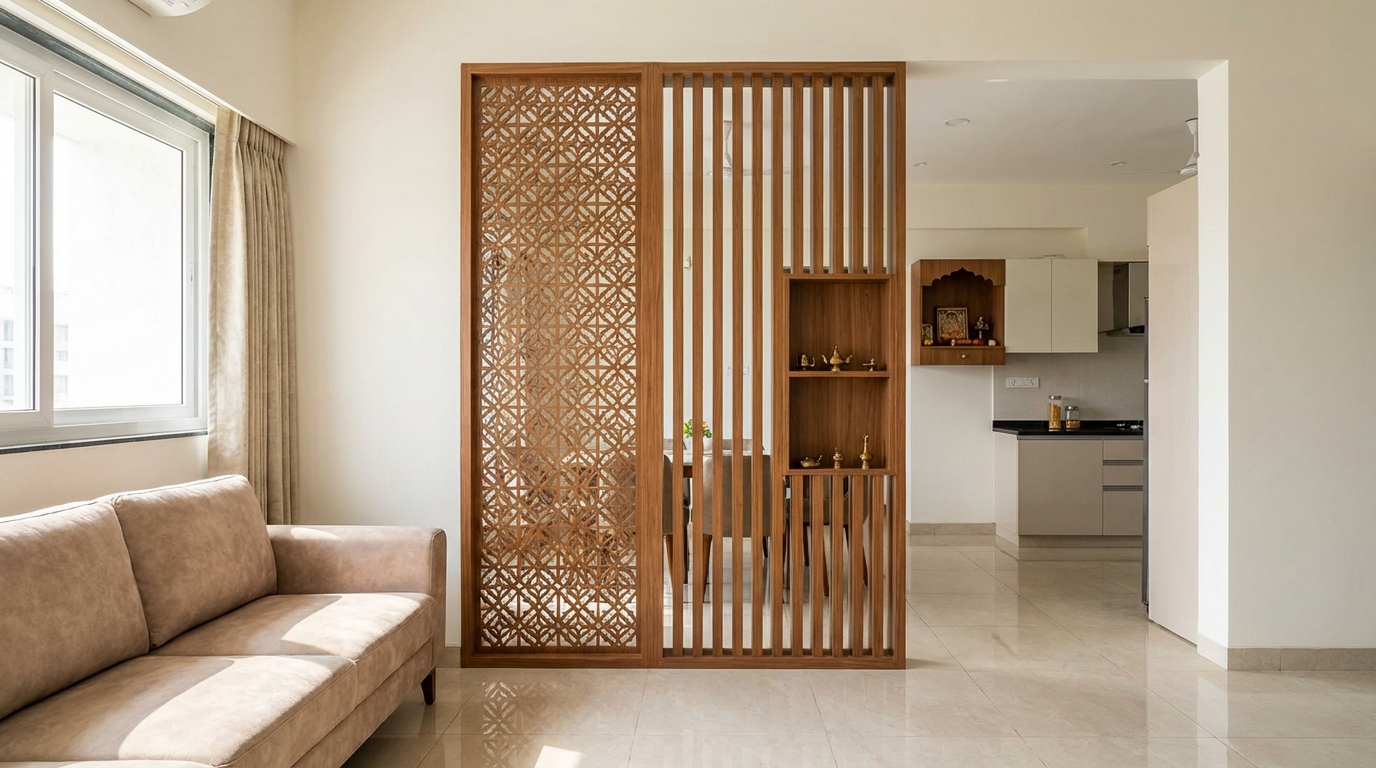
Diamond pattern: Diagonal moulding strips creating diamond shapes across the wall. Requires precise 45° cuts and works best as feature wall behind beds or sofas.
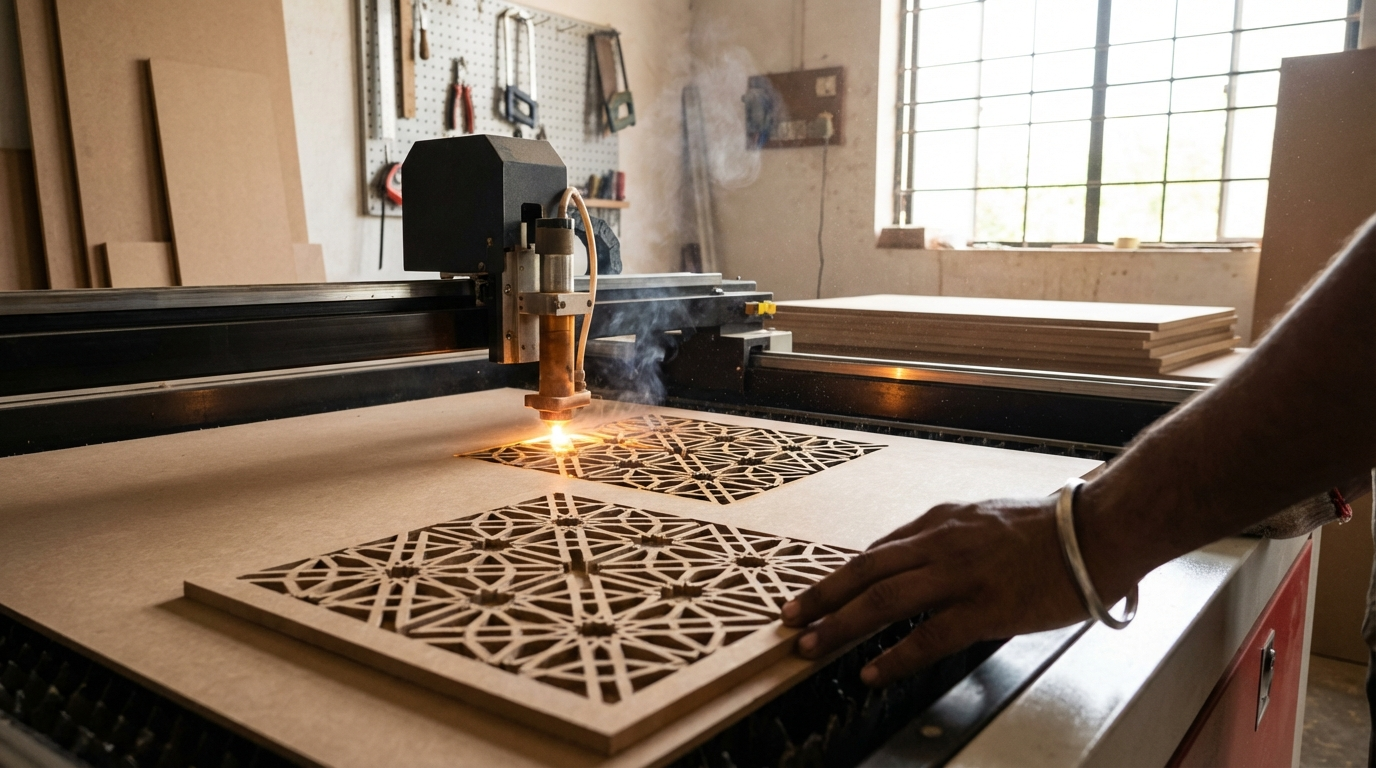
Hexagonal accent: CNC-routed hexagon patterns for contemporary spaces. More expensive but creates unique focal points in entryways.
Asymmetric frames: Irregularly sized rectangular frames breaking traditional symmetry. Popular in 2026 for creating artistic statement walls.
Traditional Indian-Inspired Patterns
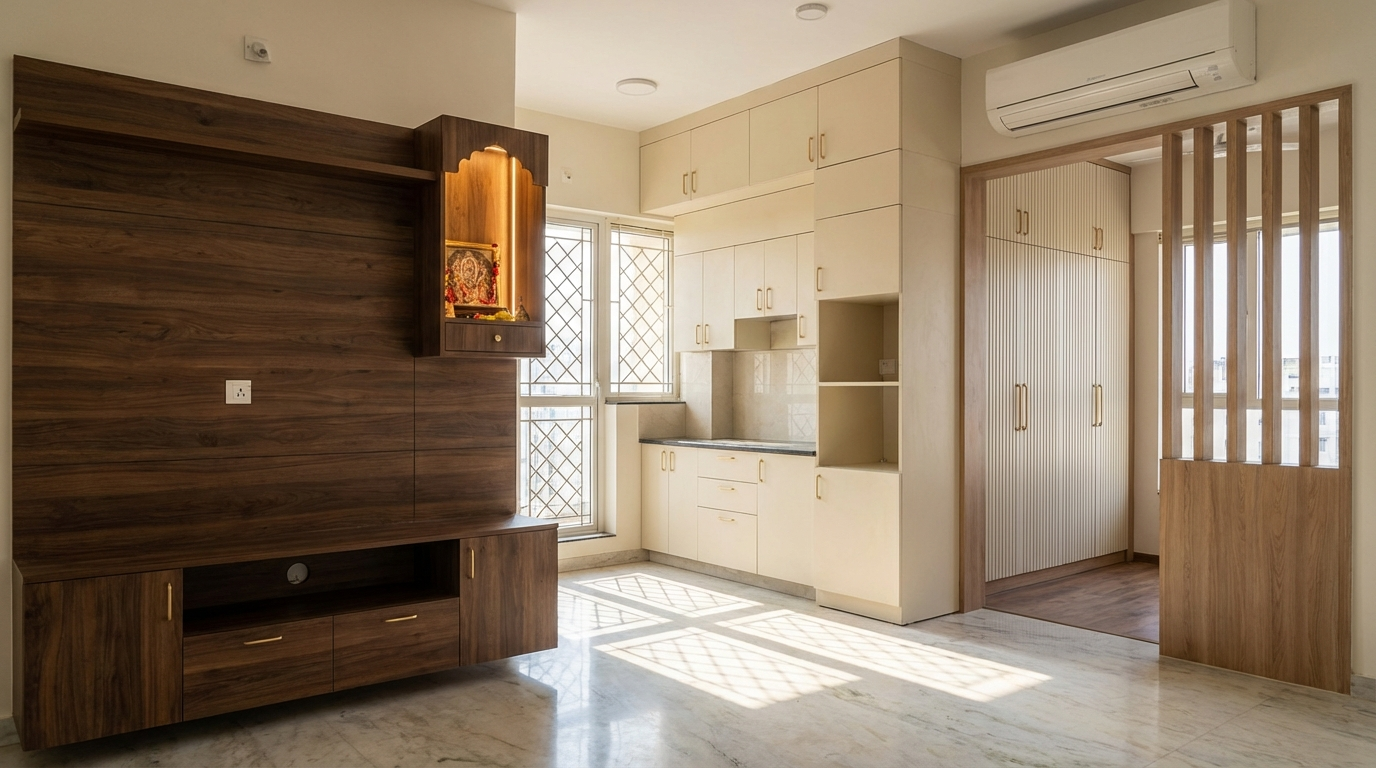
Arch motif panels: Semi-circular tops on rectangular panels echoing Mughal architecture. Suitable for prayer rooms, entryways, and heritage-style homes.
Jali-inspired geometric: Intricate CNC patterns mimicking traditional stone jali work. Best executed with HDF for sharp detail retention.
20 MDF Moulding Design Ideas by Room
Living Room (5 ideas):
- Full-height wainscoting behind TV unit
- Picture frame moulding gallery wall
- Crown and baseboard combination for classic finish
- Vertical slat accent wall behind sofa
- Geometric pattern feature wall with integrated lighting
Bedroom (5 ideas):
- Headboard wall with raised panel moulding
- Half-height wainscoting with chair rail
- Ceiling coffer pattern using crown moulding
- Wardrobe wall framing with architrave profiles
- Fluted panel accent behind bed
Dining Room (4 ideas):
- Traditional dado rail with contrasting paint above/below
- Full wall panelling in formal dining spaces
- Buffet wall with picture moulding frames
- Crown moulding with cove lighting integration
Entryway and Corridors (3 ideas):
- Arch-top panels creating visual interest
- Chair rail throughout corridor for continuity
- Accent wall with bold geometric pattern
Pooja Room (3 ideas):
- Arch motif frames around mandir area
- Traditional raised panel wainscoting
- CNC jali-pattern feature wall
MDF Moulding Price Ranges and Cost Factors
Understanding pricing helps budget accurately and identify value versus overcharging. Prices vary significantly based on profile complexity, MDF grade, and regional market conditions.
Price Ranges by Profile Type (January 2026)
| Profile Type | Standard MDF (₹/rft) | MR-MDF (₹/rft) | Pre-Primed (₹/rft) |
|---|---|---|---|
| Simple baseboard (75mm) | 35-50 | 45-65 | 55-75 |
| Decorative baseboard (100mm) | 50-75 | 65-95 | 80-110 |
| Chair rail (50mm) | 30-45 | 40-60 | 50-70 |
| Crown moulding (75mm) | 55-80 | 70-100 | 85-120 |
| Crown moulding (100mm+) | 75-110 | 95-140 | 115-165 |
| Panel moulding (25mm) | 20-30 | 28-40 | 35-50 |
| Door casing (75mm) | 45-65 | 60-85 | 75-100 |
Note: Prices are indicative ranges and vary by manufacturer, location, and order quantity. Always obtain multiple quotations.
Cost Drivers Beyond Material
- Profile complexity: More curves and details increase CNC machining time by 30-60%
- MDF grade: MR-MDF adds 25-35% over standard interior grade
- Pre-finishing: Factory priming adds 15-25% but reduces on-site labour
- Order quantity: Bulk orders (500+ rft) typically get 10-15% discount
- Custom profiles: Non-standard designs require tooling charges (₹5,000-15,000 one-time)
- Delivery distance: Freight from manufacturing hubs adds ₹3-8 per rft for distant locations
Installation Cost Estimation
Labour rates (typical urban India):
- Simple baseboard installation: ₹15-25 per running foot
- Crown moulding installation: ₹30-50 per running foot
- Wall panelling with moulding: ₹40-70 per square foot
- Complex geometric patterns: ₹60-100 per square foot
Sample budget for 12x15 feet living room feature wall:
- Wainscoting panels (180 sq ft coverage): ₹8,000-15,000 material
- Panel moulding (280 rft): ₹7,000-12,000 material
- Installation labour: ₹12,000-20,000
- Primer and paint: ₹4,000-7,000
- Total estimate: ₹31,000-54,000
Step-by-Step MDF Wall Moulding Installation Guide
Successful MDF moulding installation requires proper preparation, precise measurement, and correct technique. Here's the complete process for DIY installation or supervising professional work.
Tools and Materials Required
- Measuring tape and pencil
- Spirit level (4-foot minimum)
- Mitre saw or mitre box with hand saw
- Power drill with countersink bit
- Brad nailer (pneumatic or electric) or finishing nails
- Construction adhesive (grab adhesive type)
- Wood filler or MDF-specific filler
- Caulk and caulk gun
- Sandpaper (120 and 220 grit)
- MDF primer
- Paint and painting supplies
Step 1: Wall Preparation
Inspect walls for bumps, holes, and cracks. Sand down high spots and fill low areas with wall putty. The wall surface must be flat—MDF moulding accentuates wall imperfections rather than hiding them. Remove loose paint and ensure walls are clean and dry.
Failure point: Installing over damp or uneven walls leads to adhesive failure and visible gaps.
Step 2: Design Layout and Marking
Transfer your design to the wall using spirit level and pencil. For panel patterns, calculate panel sizes ensuring symmetry. Mark vertical centre line first, then work outward. For baseboards and chair rails, mark horizontal lines at consistent heights around the room.
Verification check: Step back 3 metres and verify lines look level and proportioned before proceeding.
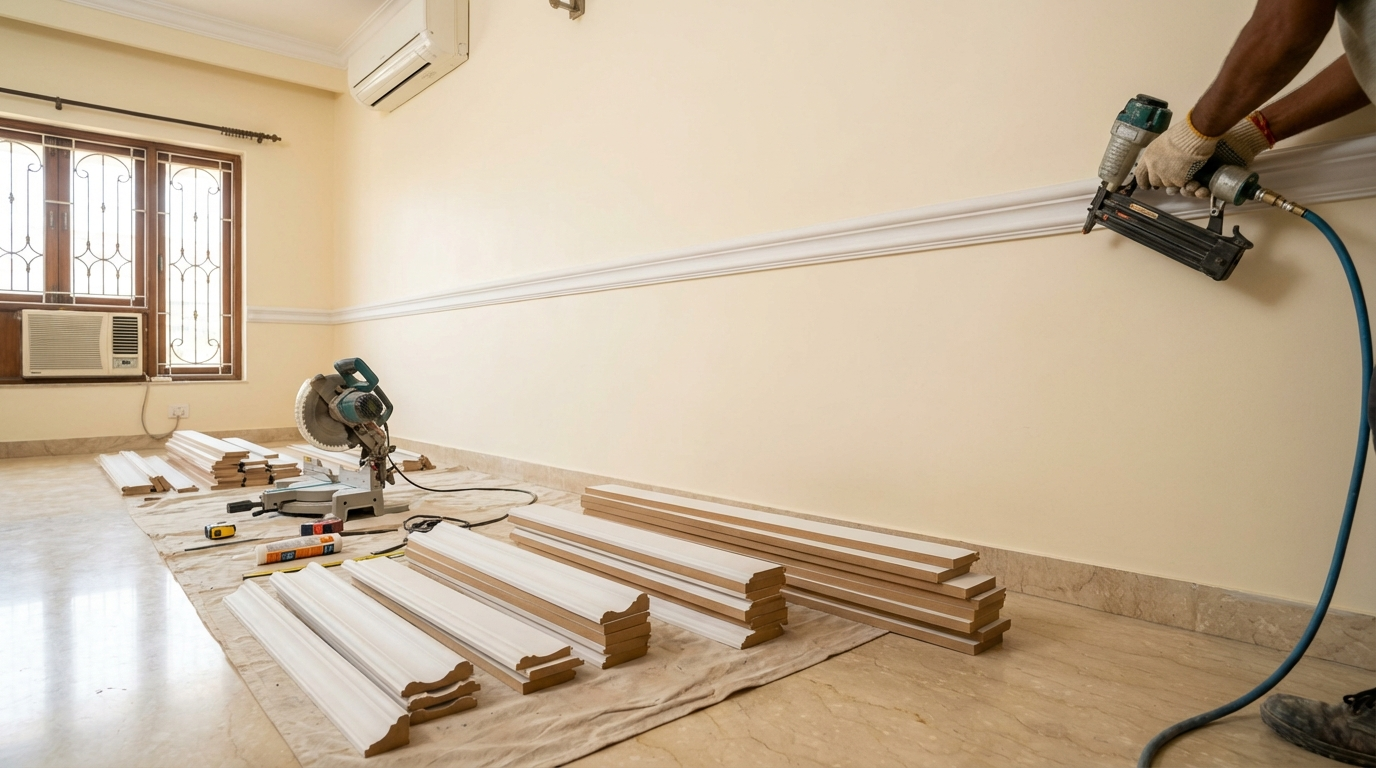
Step 3: Measure and Cut Moulding
Measure each piece individually—walls are rarely perfectly square. Cut slightly long (2-3mm) and test fit before final trim. For inside corners, cut 45° mitre with the moulding face up. For outside corners, cut with face down. Always make test cuts on scrap pieces first.
Failure point: Cutting all pieces to identical lengths assuming walls are square causes gaps at corners.
Step 4: Prime Cut Edges
Apply MDF primer to all cut edges before installation. This critical step prevents moisture absorption at exposed edges—the primary failure mode for MDF moulding in Indian conditions. Allow primer to dry completely (typically 2-4 hours).
Step 5: Apply Adhesive
Apply construction adhesive in zigzag pattern on the back of moulding, staying 10-15mm from edges to prevent squeeze-out. Use adhesive rated for MDF and wall surfaces. Don't apply adhesive and leave pieces sitting—install within 10 minutes of application.
Step 6: Position and Secure
Press moulding firmly against wall, aligning with marked lines. For profiles over 50mm width, use brad nails every 400-500mm for additional security while adhesive cures. Countersink nails slightly below surface.
Verification check: Use level to confirm each piece is straight before moving to next.
Step 7: Fill Gaps and Nail Holes
Fill nail holes with MDF filler (not wood filler—it shrinks differently). Caulk gaps where moulding meets wall—this creates seamless appearance and prevents moisture entry. Allow filler to dry 24 hours before sanding.
Step 8: Sand and Prime Entire Surface
Sand filled areas smooth with 120 grit, then entire surface with 220 grit. Wipe dust with tack cloth. Apply MDF primer to all surfaces—MDF is porous and requires primer for paint to adhere properly and achieve smooth finish.
Step 9: Final Painting
Apply two coats of quality interior paint using fine-nap roller for flat surfaces and brush for detailed areas. Sand lightly between coats with 320 grit for professional finish. Allow full cure time (typically 7 days) before cleaning or touching.
Decision Framework: Which MDF Grade for Which Condition
| Condition | Recommended Choice | What to Verify |
|---|---|---|
| Air-conditioned living rooms | Standard interior MDF | AC runs consistently; humidity below 65% |
| Non-AC bedrooms (North India) | Standard interior MDF | Summer humidity manageable; good ventilation |
| Non-AC rooms (Coastal cities) | MR-MDF (Moisture Resistant) | Verify MR grade marking; seal all edges |
| Kitchen walls (away from sink) | MR-MDF with sealed edges | No direct water splash; exhaust fan functional |
| Bathroom accent walls (dry zones) | MR-MDF or HDHMR | Completely away from wet areas; excellent ventilation |
| High-impact areas (corridors, stairs) | HDF or 18mm MDF | Verify density for impact resistance |
| Rental properties (cost priority) | Standard MDF with proper sealing | Focus on edge sealing; accept shorter lifespan |
| Premium permanent installations | Pre-primed MR-MDF | Factory priming quality; consistent thickness |
Common Buyer Mistakes (And How to Avoid Them)
Learning from others' errors saves time, money, and frustration. These are the most frequent mistakes observed in Indian MDF moulding projects.
Mistake 1: Ignoring Edge Sealing
Consequence: Moisture absorption causes swelling, paint bubbling, and eventual delamination within 1-2 monsoon seasons.
Prevention: Prime all cut edges before installation. Use two coats on edges exposed to higher humidity.
Mistake 2: Using Standard MDF in Humid Zones
Consequence: Premature failure requiring complete replacement within 2-3 years.
Prevention: Specify MR-MDF for coastal cities and rooms without air conditioning.
Mistake 3: Skipping Wall Preparation
Consequence: Moulding doesn't sit flat, creating visible gaps and adhesive failure.
Prevention: Level walls with putty, sand high spots, and ensure completely dry before installation.
Mistake 4: Ordering Exact Quantities
Consequence: Cutting errors and mitre waste leave project incomplete, with colour matching problems on reorder.
Prevention: Order 15-20% extra for wastage. Store excess for future repairs.
Mistake 5: Relying Only on Adhesive
Consequence: Heavy profiles or profiles in non-AC rooms fail as adhesive loosens over temperature cycles.
Prevention: Use combination of construction adhesive plus brad nails for profiles over 50mm width.
Mistake 6: Measuring Once, Cutting Wrong
Consequence: Wasted material, visible gaps, and unprofessional finish.
Prevention: Measure each piece individually. Test fit before final cut. Remember: walls are never perfectly square.
Mistake 7: Cheap Paint on Quality MDF
Consequence: Paint doesn't cover well, requires multiple coats, or peels prematurely.
Prevention: Use quality paint appropriate for MDF. Proper primer is more important than expensive topcoat.
Mistake 8: Ignoring Acclimatization
Consequence: MDF expands or contracts after installation, creating gaps or buckles.
Prevention: Store MDF in installation room for 48-72 hours before fitting to equalize moisture content.
Failure Modes and How to Prevent Them
Understanding how MDF moulding fails helps prevent problems and address issues early.
Failure Mode 1: Edge Swelling
Symptom: Moulding edges become puffy, paint cracks along edges, joints open up.
Root cause: Moisture absorption through unsealed cut edges, especially during monsoon.
Prevention: Seal all edges with primer. Use MR-MDF in humid conditions.
Fix if already happening: Sand affected edges, seal with wood hardener, re-prime and repaint. Replace severely damaged sections.
Failure Mode 2: Paint Bubbling/Peeling
Symptom: Paint lifts from surface in bubbles or sheets.
Root cause: Inadequate priming allowing moisture under paint film; painting over dusty surface.
Prevention: Clean surfaces thoroughly. Apply MDF-specific primer. Allow full drying between coats.
Fix if already happening: Scrape loose paint, sand smooth, re-prime affected areas, repaint entire surface.
Failure Mode 3: Joints Opening
Symptom: Visible gaps appearing at mitre joints and butt joints.
Root cause: Seasonal expansion/contraction; inadequate adhesive; wall movement.
Prevention: Use flexible caulk at joints. Allow acclimatization before installation.
Fix if already happening: Re-caulk joints with paintable caulk. Touch up paint after caulk cures.
Failure Mode 4: Moulding Pulling Away
Symptom: Moulding separates from wall, creating visible gaps at top or bottom.
Root cause: Adhesive failure; heavy profile without mechanical fastening; wall surface contamination.
Prevention: Clean walls thoroughly. Use quality adhesive plus nails. Don't overload adhesive.
Fix if already happening: Re-adhere with fresh adhesive. Add concealed nails for mechanical support.
Failure Mode 5: Surface Denting
Symptom: Visible dents and impressions on moulding surface.
Root cause: Impact damage during handling or use; insufficient hardness for application.
Prevention: Use HDF for high-traffic areas. Handle carefully during transport and installation.
Fix if already happening: Fill dents with MDF filler, sand smooth, touch up paint.
Failure Mode 6: Warping
Symptom: Moulding curves away from wall between fixing points.
Root cause: Thin profile without adequate support; uneven moisture exposure on front vs back.
Prevention: Use appropriate thickness for span. Seal all surfaces including back. Add more fixing points.
Fix if already happening: Add additional nails/adhesive at warp points. Replace severely warped sections.
Quality Checks Without Lab Tests
You don't need expensive testing equipment to verify MDF moulding quality. Here are practical checks anyone can perform.
Before Buying: Visual and Physical Checks
- Surface smoothness: Run hand across face—should feel uniformly smooth without rough patches
- Edge consistency: Examine cut edges—core should appear uniform without voids or loose fibres
- Straightness: Sight along length—any twist or bow indicates storage issues
- Profile sharpness: Details should be crisp, not rounded or fuzzy from worn tooling
- Colour consistency: Uniform colour indicates consistent density throughout
- Weight check: Heavier typically indicates higher density for same dimensions
Questions to Ask Supplier
- Is this standard MDF or MR-MDF? (Request grade certificate if MR-MDF)
- What is the density rating? (Should be 650-850 kg/m³ for quality MDF)
- Are profiles made from single sheet or laminated strips?
- What is the warranty against manufacturing defects?
- Can you provide a sample piece for testing?
Red Flags to Avoid
- Unusually low pricing (may indicate inferior density or recycled content)
- Visible surface defects marketed as "minor imperfections"
- Inconsistent thickness across batch
- Strong chemical odour (indicates excessive formaldehyde)
- Supplier unable to confirm MDF grade or source
After Cutting: Quality Verification
- Core inspection: Cut edge should show consistent colour and density throughout
- No delamination: Surface shouldn't separate from core during cutting
- Clean cut: Quality MDF cuts cleanly without excessive tear-out
- Screw holding: Test screw should grip firmly without stripping
After Installation: Ongoing Checks
- Inspect joints after first monsoon season for any opening
- Check edges for any swelling or paint lifting
- Verify paint adhesion by pressing adhesive tape and peeling
- Look for any warping or pulling away from walls
Tips by User Type
For Homeowners
Durability expectations: Well-installed MDF moulding lasts 10-15 years in climate-controlled rooms, 5-8 years in non-AC humid conditions. Plan for touch-up painting every 3-5 years.
Cleaning do's and don'ts:
- Do: Dust regularly with soft cloth or vacuum brush attachment
- Do: Wipe stains with slightly damp cloth, dry immediately
- Don't: Use wet mopping on baseboards
- Don't: Apply harsh chemicals or abrasive cleaners
When to worry: Immediate attention needed if paint bubbles appear, edges feel soft or swollen, or joints open more than 2mm. Address moisture source before repair.
For Carpenters and Contractors
Cutting tips:
- Use fine-tooth blade (60+ teeth for mitre saw) to minimize tear-out
- Cut slightly long and fine-tune with block plane
- Support long pieces adequately to prevent flexing during cut
- Score surface with utility knife before cutting to prevent edge chipping
Edge preparation:
- Sand cut edges with 180 grit before priming
- Apply two coats of primer on edges that will face high-humidity zones
- Never install with raw edges—even if painted later, moisture enters during wait
Screw zones and hinge areas:
- Pre-drill for all screws to prevent splitting
- Use pilot hole 80% of screw core diameter
- For hinges on MDF doors, use longer screws into wall framing where possible
Handling precautions:
- Store flat, never on edge—prevents warping
- Keep wrapped until ready for installation
- Handle by supporting length, not by ends—prevents breakage
For Architects and Interior Designers
Specification language:
- Specify density: "Minimum 680 kg/m³ MDF per IS 14587"
- Specify grade: "E1 emission class" or "CARB Phase 2 compliant"
- Specify moisture resistance: "MR grade with moisture content 5-8%"
- Specify finish: "Factory primed ready for site painting" or "Unprimed for site finishing"
Wet-zone detailing:
- Maintain 100mm minimum clearance from shower wet zones
- Specify silicone bead at wall junction in bathroom applications
- Consider PVC or HDHMR alternatives for direct splash zones
Finish selection:
- Enamel paints: Durable, cleanable, but less forgiving of surface prep errors
- Latex/acrylic: More flexible, better for seasonal expansion, easier application
- Specify satin or semi-gloss for moulding—flat finish shows imperfections
For Modular/OEM Manufacturers
QC checkpoints:
- Incoming material: Verify density, moisture content, and sheet flatness
- After routing: Check profile accuracy against master template
- After priming: Verify complete coverage including edges
- Before packing: Final visual inspection for surface defects
Reducing complaints:
- Include handling and storage instructions with every shipment
- Photograph packaging condition before dispatch
- Specify MR-MDF default for coastal city deliveries
- Offer pre-finished options to reduce site finishing failures
Batch consistency:
- Source MDF sheets from single lot for consistent colour match
- Maintain cutting blade sharpness—replace or sharpen every 500-800 metres
- Calibrate CNC machines weekly for profile consistency
Frequently Asked Questions
What is MDF moulding made of and why is it suitable for wall decoration?
MDF moulding is manufactured from Medium Density Fibreboard, an engineered wood product made by binding wood fibres with synthetic resin under high temperature and pressure. It's suitable for wall decoration because its uniform density allows precise machining into detailed profiles, its surface accepts paint beautifully without grain showing through, and it costs significantly less than solid wood while achieving similar visual results. For Indian homes, MDF moulding provides an affordable way to add architectural interest to otherwise plain walls.
Can MDF wall moulding be used in bathrooms and kitchens in India?
MDF moulding can be used in kitchens and bathroom dry zones if you select MR-MDF (moisture resistant grade) and ensure all edges are properly sealed with primer. However, it should never be installed in direct wet zones like shower areas or above kitchen sinks where water splashes regularly. In humid Indian coastal cities, even dry zones require MR-MDF with particular attention to ventilation. Standard MDF will fail within 1-2 monsoon seasons in high-humidity areas without air conditioning.
How much does MDF moulding cost compared to solid wood moulding in India?
MDF moulding typically costs 40-70% less than equivalent solid wood profiles. While simple MDF baseboards range from ₹35-75 per running foot, comparable solid wood profiles often cost ₹100-200 per running foot or more. Additionally, MDF requires less skilled labour for installation since it machines easily and doesn't have grain direction considerations. However, MDF requires proper edge sealing and specific primers, so factor in these material costs when comparing total project expenses.
What is the best way to paint MDF moulding for a professional finish?
Professional MDF moulding painting requires proper priming—this is non-negotiable because MDF is highly porous and absorbs paint unevenly without primer. Start with MDF-specific primer on all surfaces including edges, sand lightly with 220 grit after primer dries, then apply two coats of quality interior paint. Use foam roller for flat surfaces and quality brush for detailed areas. Sand between coats with 320 grit for smoothest results. Always allow full drying time between coats as specified by manufacturer.
How do I cut MDF moulding for perfect mitre joints at corners?
Perfect mitre joints require a quality mitre saw set precisely at 45 degrees and a sharp, fine-tooth blade (60+ teeth). Before cutting, score the cut line with a utility knife to prevent edge tear-out. Support long pieces adequately during cutting to prevent movement. Cut pieces slightly long (1-2mm) and test fit before final trimming. For inside corners, cut with moulding face up; for outside corners, cut face down. Always make test cuts on scrap pieces to verify saw accuracy before cutting actual moulding.
What thickness of MDF is best for wall moulding in residential applications?
For most residential wall moulding applications, 9mm to 12mm thickness provides optimal balance of visual depth and handling ease. Thinner 6mm profiles work for delicate panel moulding within frames but can warp if used for larger baseboards. Thicker 18mm profiles create more dramatic shadow lines but add weight and cost. Choose thickness based on the scale of your room—higher ceilings and larger rooms benefit from bolder, thicker profiles while compact spaces look better with more delicate dimensions.
How do I prevent MDF moulding from swelling during monsoon season?
Preventing monsoon swelling requires three protective measures: first, use MR-MDF instead of standard MDF in humid regions; second, seal all edges with primer before installation, applying two coats on edges facing higher humidity; third, ensure the paint film completely encapsulates all MDF surfaces without gaps. Additionally, maintaining indoor humidity below 70% through ventilation or air conditioning significantly extends MDF moulding lifespan. If you notice early swelling signs, address the moisture source immediately before damage spreads.
Can I install MDF wall moulding myself or do I need a professional?
Basic MDF moulding installation like chair rails and simple baseboards is achievable for DIY enthusiasts with basic tools and patience. You'll need a mitre saw or mitre box, spirit level, adhesive, brad nailer or hammer, and painting supplies. Complex crown moulding and intricate patterns benefit from professional installation due to the compound angles and precise fitting required. If you're attempting DIY, start with a small, less visible area to develop skills before tackling prominent walls.
What is the difference between MDF moulding and PVC moulding for Indian homes?
MDF moulding offers superior paint adhesion, more detailed profiles, and a natural feel that PVC cannot match. PVC moulding resists moisture better but has a plastic appearance, limited profile options, and paint doesn't adhere well without special primers. For air-conditioned homes with paint finishes, MDF is preferred. For wet-zone adjacent areas or budget projects where painting isn't planned, PVC may be practical. Many homeowners use MDF for main living areas and PVC for utility spaces.
How long does MDF wall moulding last in typical Indian home conditions?
In climate-controlled rooms with proper installation, MDF moulding typically lasts 10-15 years with minimal maintenance beyond occasional touch-up painting. In non-AC rooms in humid climates, expect 5-8 years with MR-MDF grade. Standard MDF in humid conditions may show deterioration within 2-3 monsoon seasons. Lifespan depends heavily on edge sealing quality, paint maintenance, and indoor humidity levels. Regular inspection and prompt addressing of paint damage or moisture exposure significantly extends service life.
What are the most popular MDF wall moulding design trends in India for 2026?
In 2026, Indian interior design favours geometric panel patterns creating accent walls behind beds and sofas, minimalist wainscoting with clean rectangular frames in the lower third of walls, and fluted MDF panels adding vertical texture to feature walls. Board and batten designs creating height illusion remain popular in apartments with standard ceiling heights. Traditional arch-motif panels see renewed interest in pooja rooms and heritage-style homes. CNC-routed jali-inspired patterns offer a contemporary take on traditional Indian design elements.
How do I repair damaged MDF moulding without replacing entire sections?
Minor damage like small dents and scratches can be repaired with MDF-specific filler—apply, allow to cure completely, sand smooth with progressively finer sandpaper, prime the repair area, and touch up with matching paint. For edge damage, apply wood hardener to stabilize the area before filling. Deeper damage or swelling requires cutting out the affected section and splicing in new MDF, with joints caulked and painted to blend. Keep spare moulding from your original installation for colour-matched repairs.
Note: This is independent informational content and is not affiliated with any manufacturer.
Disclaimer: This content is provided for general informational purposes based on industry practices and publicly available information. Product specifications, standards, prices, and availability may vary by manufacturer, region, and time. Readers should independently verify details with manufacturers, dealers, or qualified professionals before making purchase or construction decisions.Want Plywood Suggestions?
Share a few details and a VIR MDF specialist will suggest suitable brands and connect you to responsive dealers.